
 Inggris
 中文简体
中文简体 Русский
 Español
 Português
 Türkçe
 العربية
 Deutsch
 Polski
 Italiano
 Français
 한국어
한국어 ไทย
ไทย Tiếng Việt
 日本語
日本語





























Rak Uji Penuaan dan Kehidupan
Pengguna manual
berlaku LISUN Model: SY2036
1. Membuka Kemasan dan Mengenal Peralatan Secara Dasar
1.1 Spesifikasi Teknis Utama
| Parameter Teknis | Note |
| Ukuran | L 1860 mm × W 800 mm × H 1150 mm (subject to change based on order requirements) |
| Berat Bersih | 260 kg (subject to change based on order requirements) |
| kekuatan Kapasitas | AC 220 V, 50/60 Hz, 12 kVA |
| Konfigurasi Regulator Tegangan | Low-voltage Voltage Regulator 0–250 V (5 kVA, 1 unit) and high-voltage Voltage Regulator 0–300 V (5 kVA, 1 unit) (Other specifications available upon request) |
| Kapasitas Beban Maksimum | 5 kVA (customizable); Maximum load current: 12 A (customizable) |
| Type and Number of Luminaires Tested | 112 B22 and 112 E27 lamps; 36 T5/T8/T12 fluorescent tubes; 22 LED panel lights (customizable for other types of luminaires if needed) |
| On/Off Life Cycle Test | Use the touchscreen to set the on/off times and view the total service life on the touchscreen. |
| Time Count Number of Tests | 0–99999 (dapat disesuaikan) |
1.2 Membuka Kemasan dan Memeriksa Isinya
1.2.1 Membuka Kemasan dan Pemeriksaan Visual
When unpacking the device, handle it gently to avoid scratching the casing with sharp tools. After unpacking, first inspect the exterior of the device to ensure there is no obvious deformation or dents, and that the buttons are not damaged or loose. If you notice any abnormalities with the device or its accessories, do not turn it on. Please contact us immediately.
1.2.2 Unit Utama dan Aksesoris
SY2036 Aging and Life Test Rack: 1 unit.
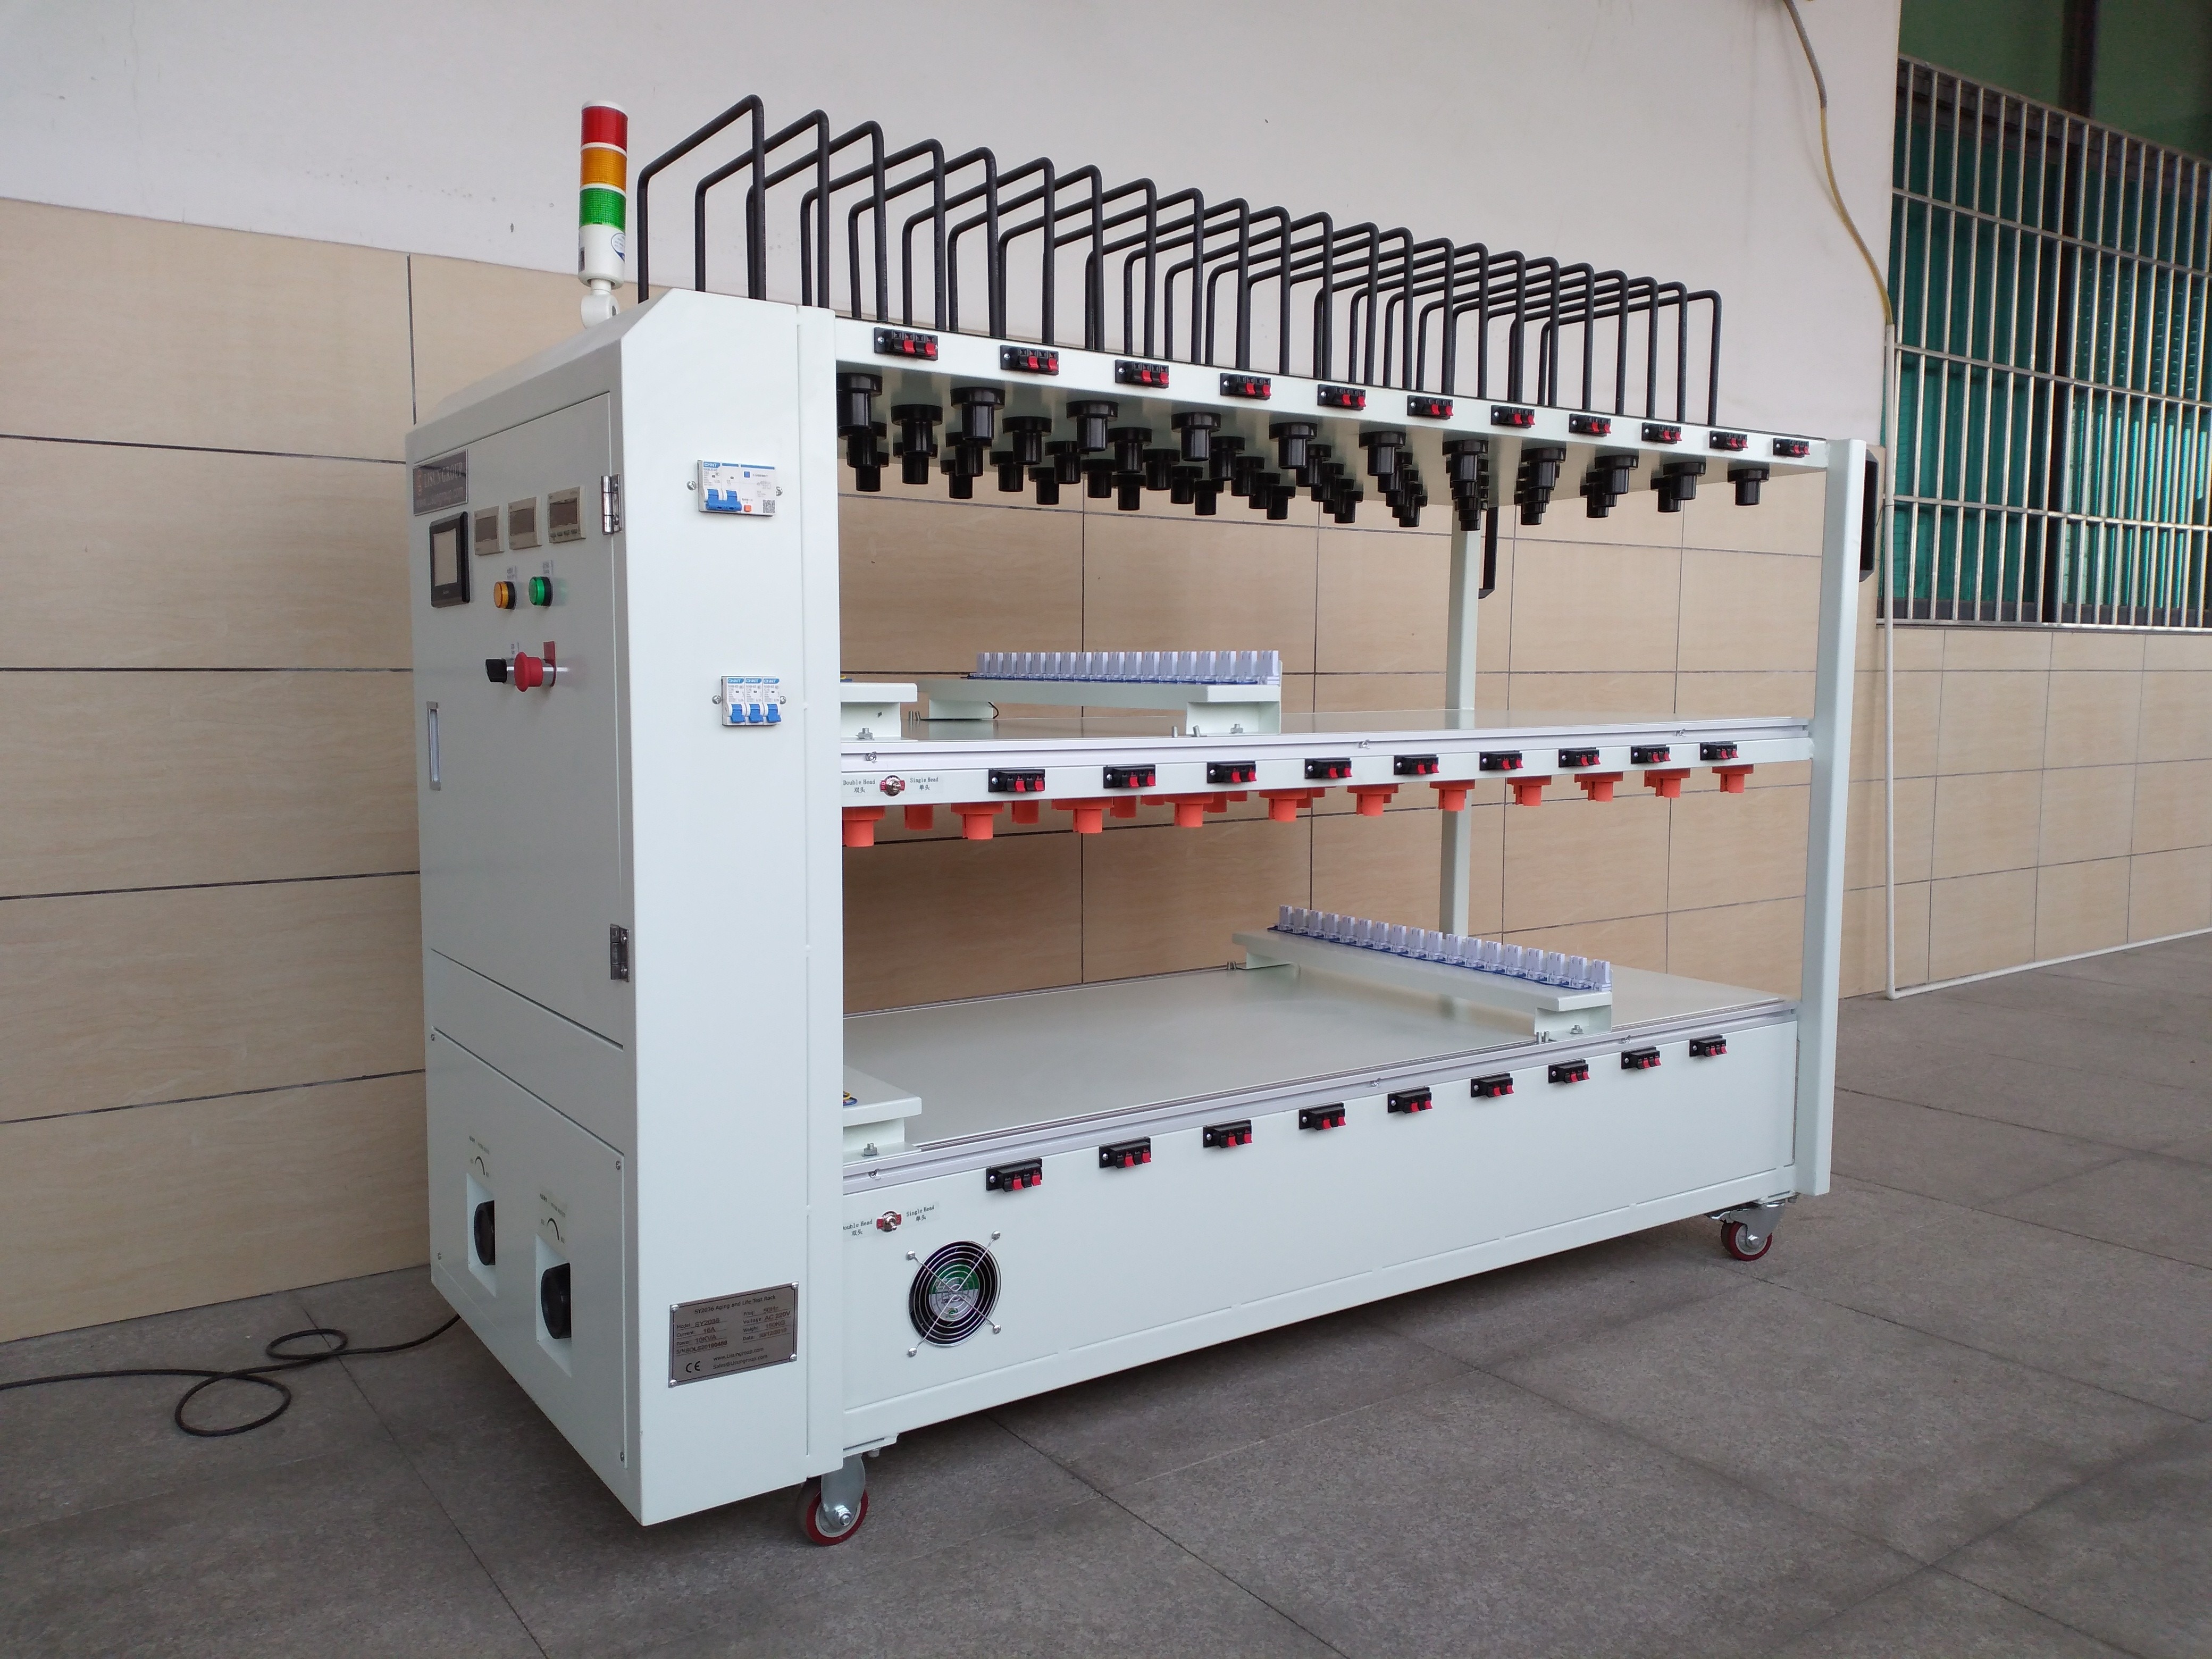
Gambar 1
Links to download the electronic user manual, warranty card, and other documents have been sent via email. Please download them as soon as possible. If you missed the email, please feel free to contact us to request the download links again.
2. Tindakan Pencegahan Keamanan
2.1 Keamanan Listrik
The equipment’s input power supply is AC 220 V, 50/60 Hz. Ensure that the power supply matches the requirements on the equipment nameplate. Never connect the equipment to a voltage other than the rated voltage to avoid short circuits or damage to the equipment.
The power cord must be made of copper wire meeting international standards with a cross-sectional area of at least 10 square, and must be equipped with a ground-fault circuit interrupter (GFCI) rated at ≥50A. It must be routed separately and must not share a circuit with other high-power devices.
The equipment must be reliably grounded, with a grounding resistance of ≤4 Ω. Before testing, check that the grounding terminals are securely connected. Do not start the test unless the equipment is properly grounded to prevent static electricity and reduce the risk of electric shock.
Before performing equipment maintenance or troubleshooting, you must turn off the power and unplug the power cord to prevent electric shock.
2.2 Prosedur Operasional
Operators must complete pre-job training and become familiar with the operating procedures outlined in this manual before operating the machine. Unauthorized personnel are strictly prohibited from operating the machine.
While the equipment is in operation, do not touch live areas, light fixtures, or high-temperature components with your hands or any other part of your body to prevent electric shock or burns.
It is strictly prohibited to remove or replace lighting samples while the equipment is in operation; testing on the corresponding floor must be stopped and the power turned off before proceeding.
Do not turn the device on and off frequently; wait at least 10 seconds between power cycle operations to prevent damage to electrical components.
2.3 Environment and Protection
The equipment should be used in a dry, well-ventilated environment free of corrosive gases, with an ambient temperature of 0–40°C and relative humidity of ≤85%. Avoid moisture or excessive dust, which can cause equipment malfunctions.
Do not cover the ventilation openings while the equipment is running, and do not place flammable or explosive materials near the equipment. If an alarm sounds, stop the test immediately; restart the equipment only after the fault has been resolved.
Place on a sturdy, level, and dry surface; avoid tilting or vibration; the floor must have a load-bearing capacity of at least 300 kg/m².
The area where the equipment is located must be equipped with approved fire extinguishing equipment (such as dry powder fire extinguishers and 1211 fire extinguishers), which must be placed in easily accessible locations.
2.4 Lainnya
Untuk hal-hal yang tidak tercakup dalam panduan ini, harap berhati-hati atau hubungi kami.
3. Equipment Overview and Operation
3.1 Connecting the Power Cord
Open the door of the electrical control cabinet on the front panel of the aging rack.
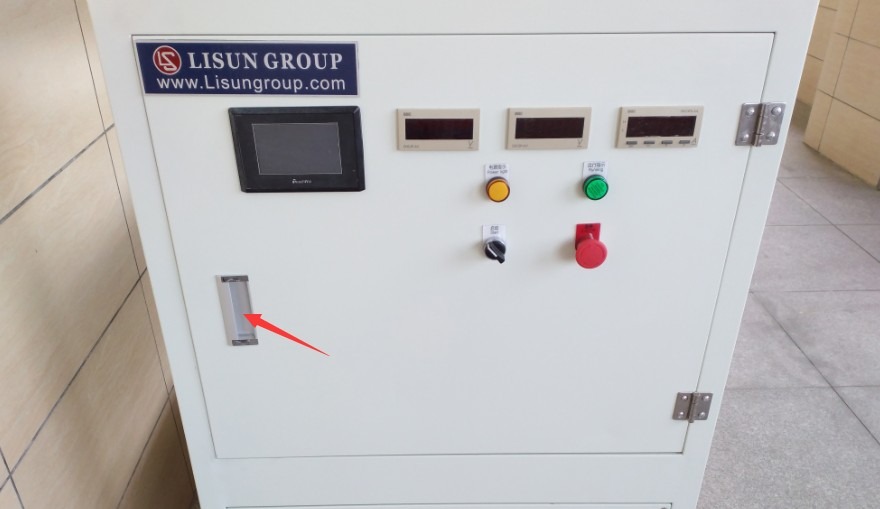
Gambar 2
| Jumlah | Note |
| ① | Connect the correct power source to the device according to the nameplate. |
| ② | For connecting the ground wire |
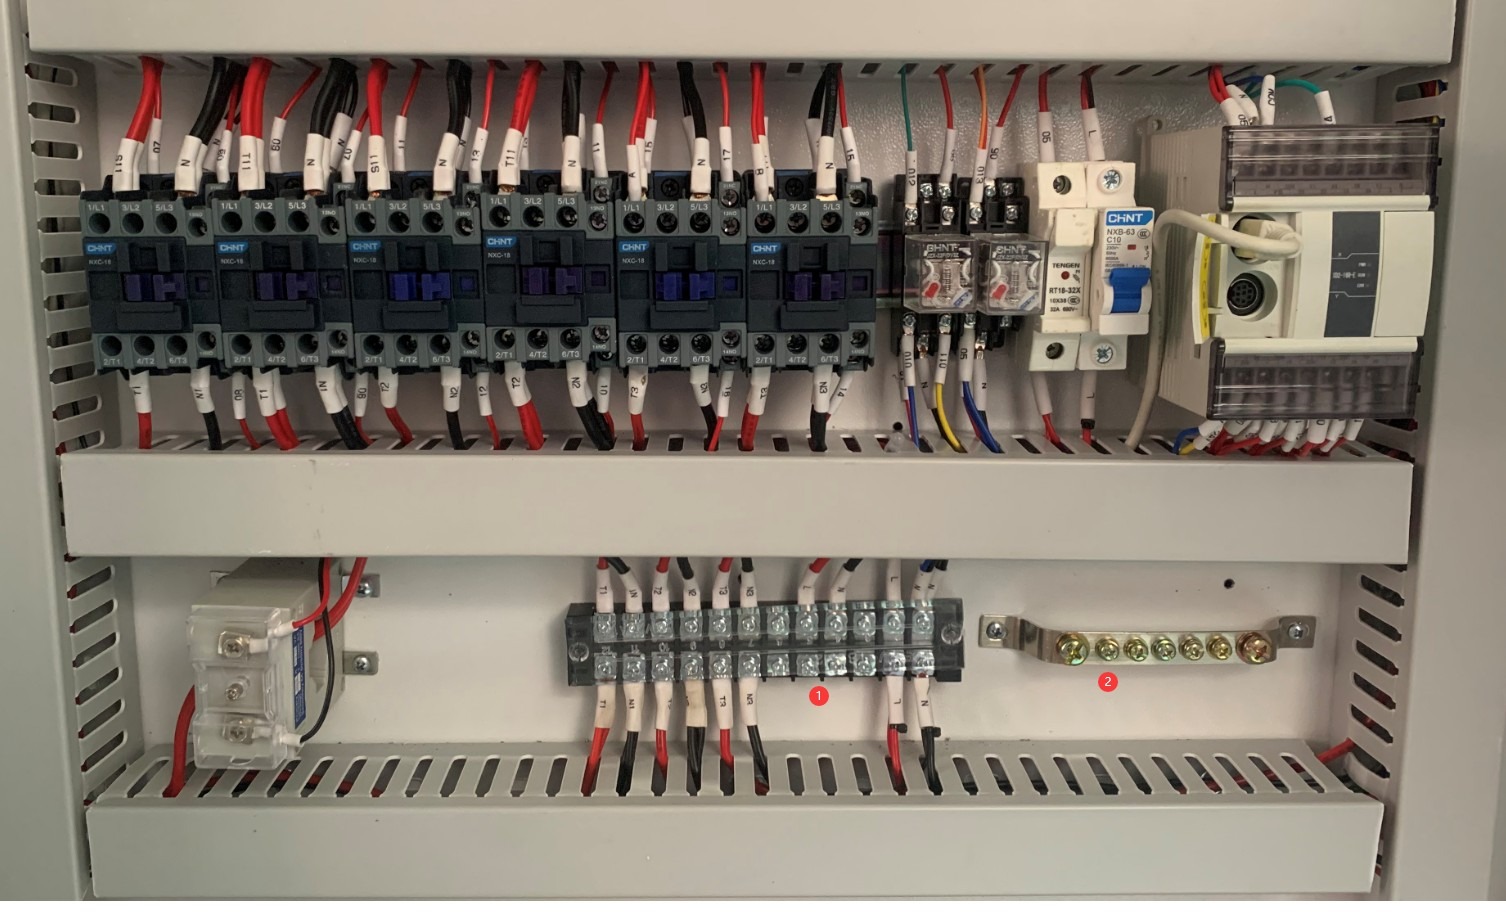
Gambar 3
Cables can be routed through the openings at the bottom of the device.
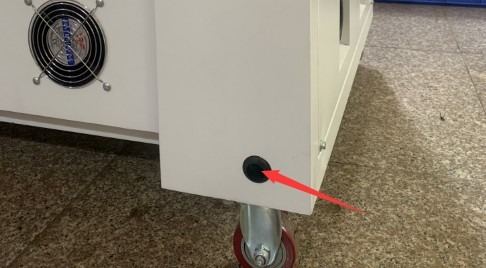
Gambar 4
3.2 Installing and Powering On the Sample Luminaires
3.2.1 Installation Locations for Different Light Fixtures
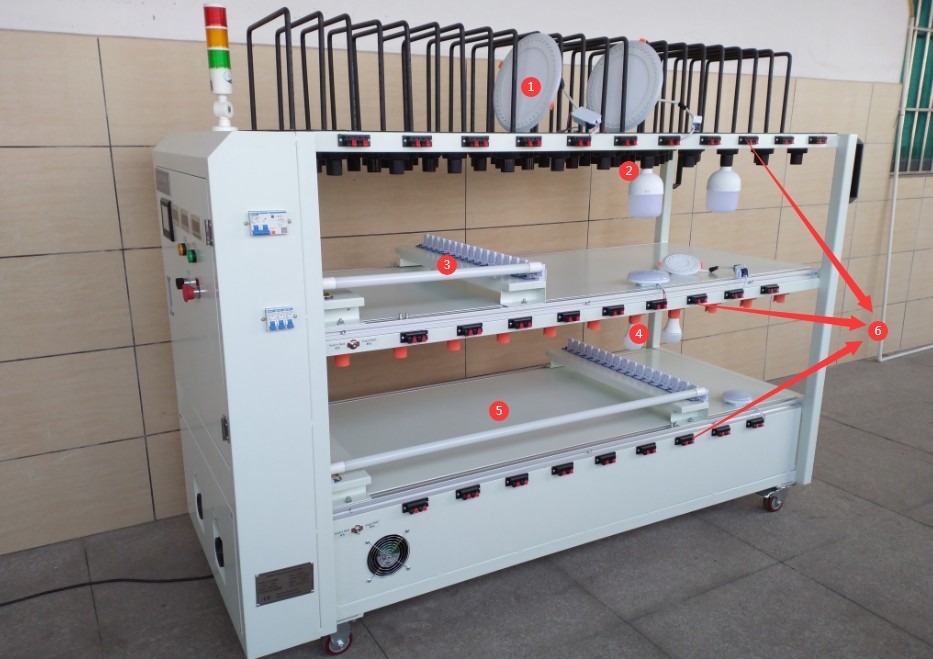
The standard aging rack has three tiers.
| Jumlah | Note |
| ① | Top of the first layer; compatible with flat lighting fixtures such as panel lights |
| ② | The bottom of the first layer has an E27 light socket |
| ③ | The top of the second level consists of fluorescent light fixtures |
| ④ | The bottom of the second level features a B22 lamp holder |
| ⑤ | The third layer consists of light tube fixtures |
| ⑥ | The terminal blocks on the sides of the aging rack can be used to connect the sample lamp power cord. |
Gambar 5
Note: The number of fixtures and the dimensions of the aging rack can be customized; customers can simply connect their samples according to their specific needs.
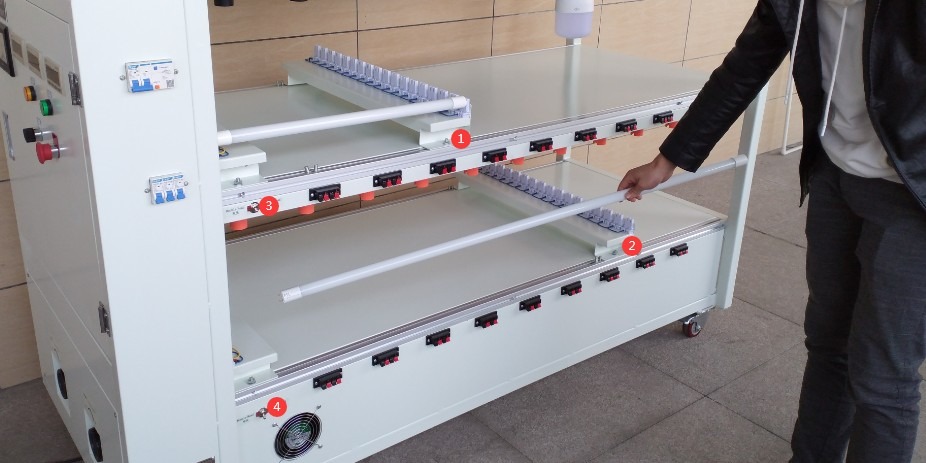
3.2.2 Operating the Lamp Fixture
| Jumlah | Note |
| ① | The position of the clamp can be adjusted according to the length of the light tube. |
| ② | |
| ③ | Single-pole/double-pole switch that controls the power supply to the light fixture on the second floor |
| ④ | Single-pole/double-pole switch to control the power supply mode for the light fixture on the third floor |
Gambar 6
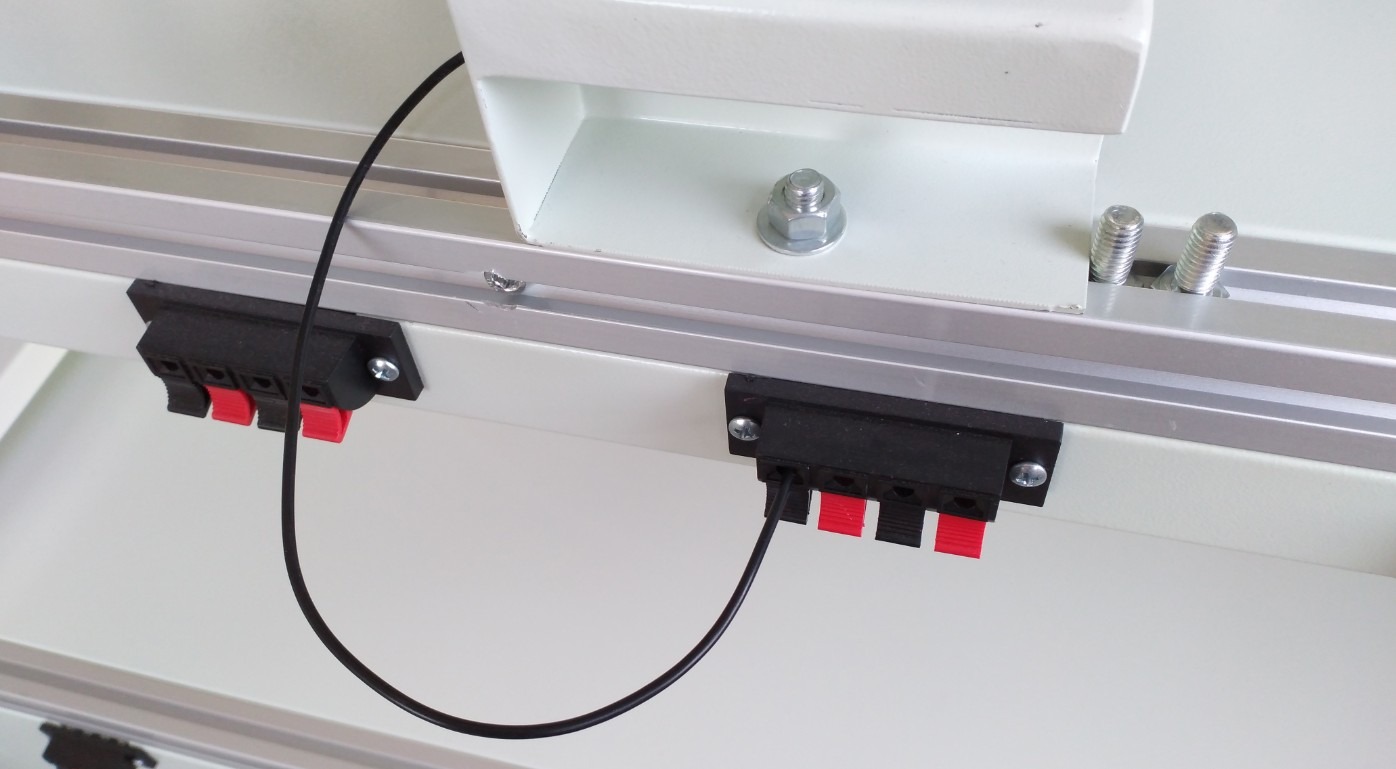
If the lamp tube is double-ended, the other end of the lamp holder will have a separate neutral wire; simply connect this neutral wire to the nearest black terminal.
Gambar 7
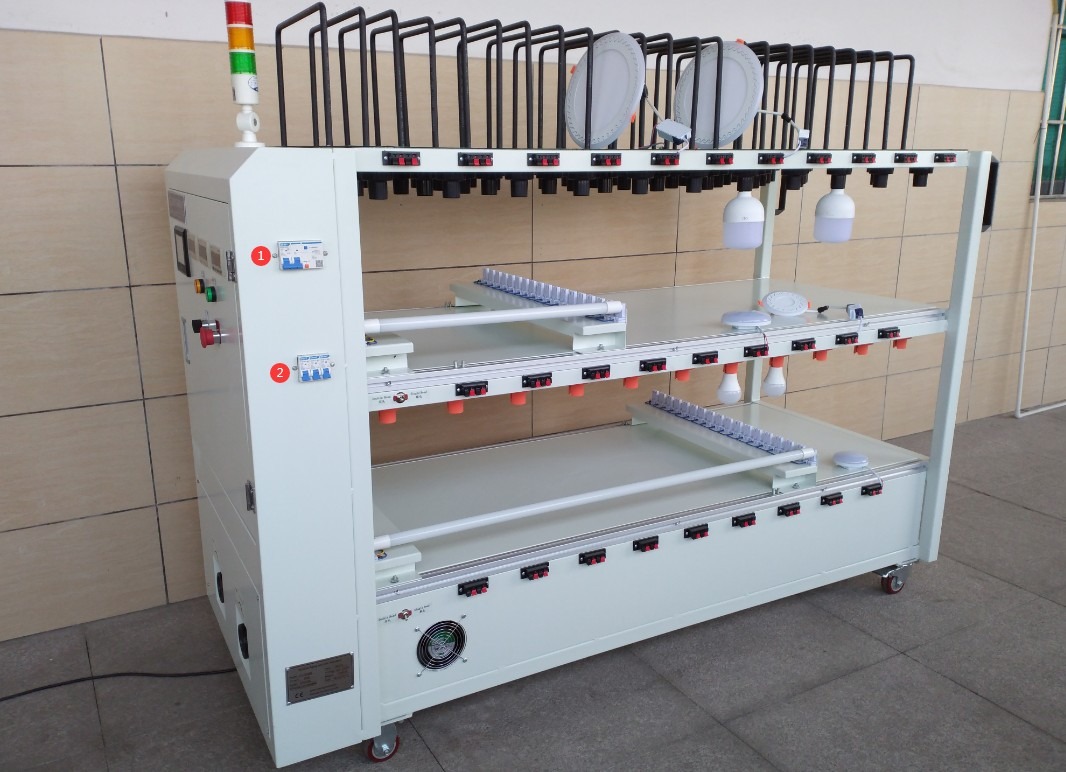
3.2.3 Power Switch for the Aging Rack
| Jumlah | Note |
| ① | Turn on the main power switch for the aging rack. |
| ② | The three switches here correspond to the three aging racks; turn on the switch for the rack that needs to undergo aging testing. |
Gambar 8
3.3 Front Panel Operations on the Aging Rack
3.3.1 Instrumentation and Control Section
| Jumlah | Note |
| ① | Equipment status indicator lights: red indicates the test is complete, yellow indicates standby, and green indicates the test is in progress. |
| ② | Low-voltage voltmeter, displays the actual output voltage of the low-voltage Voltage Regulator, in volts (V) |
| ③ | High-voltage meter, displays the actual output voltage of the High Voltage Regulator, in volts (V) |
| ④ | Ammeter, displays the total operating current of the equipment in amperes (A), and monitors load conditions in real time |
| ⑤ | Emergency Stop: Immediately cuts off all control power to the equipment when pressed; rotates to reset; used in emergencies (such as fire, electric shock, or equipment malfunction). |
| ⑥ | Touchscreen power switch; turn it clockwise to turn on the touchscreen. |
| ⑦ | Touchscreen |
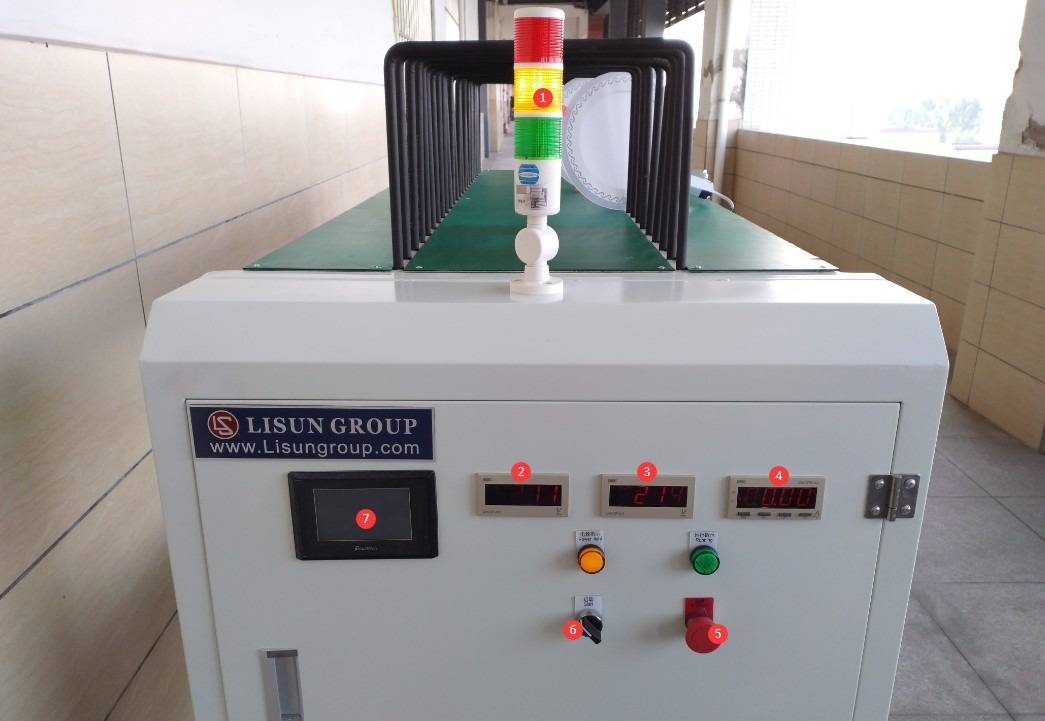
Gambar 9
Pengatur Tegangan 3.3.2
| Jumlah | Note |
| ① Low-voltage Voltage Regulator, output 0–250 V | Used to power sample lighting fixtures; features a knob-style adjustment for precise setting of the output voltage |
| ② High-voltage Voltage Regulator, output 0–300 V |
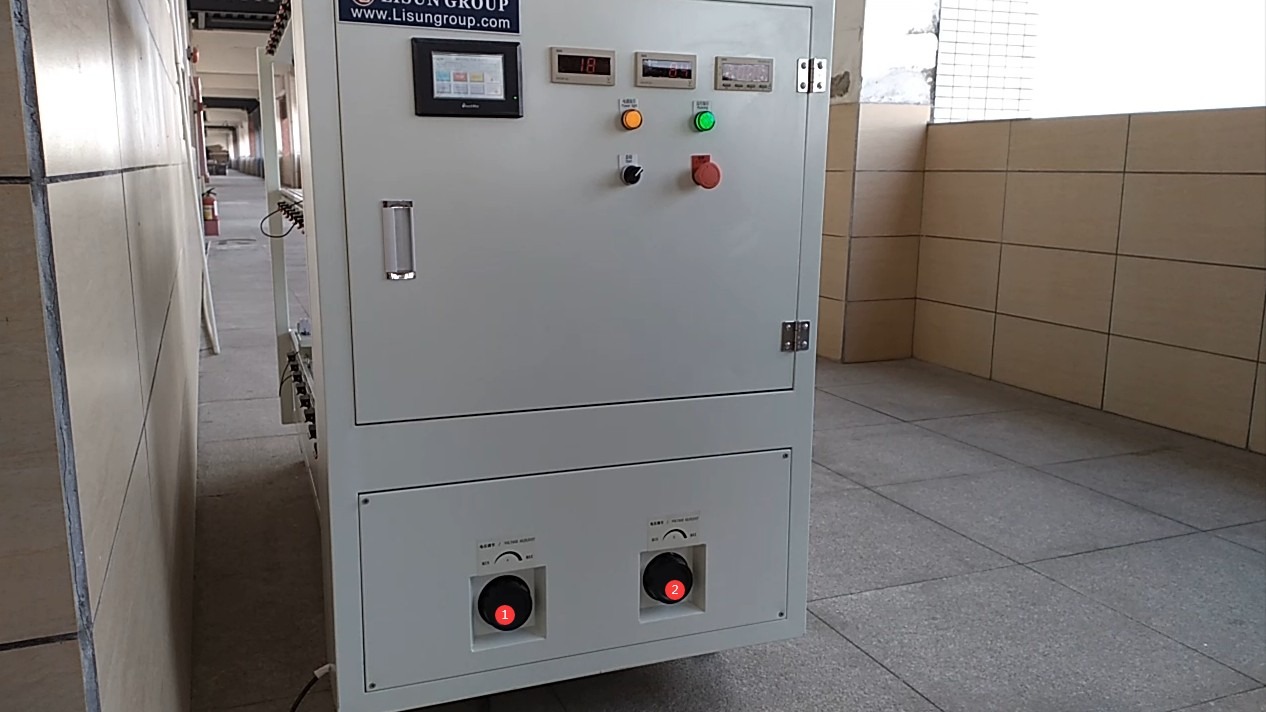
Gambar 10
4. Introduction to and Operation of the Touchscreen Program
4.1 Layar Awal
| Project | Note |
| MANUAL | Simple Operating Instructions |
| BEROPERASI | Click to open the interface |

Gambar 11
4.2 Antarmuka Pengguna
| Jumlah | Note |
| ① | Level 1—the current control interface is Level 1 |
| ② | The operational status of the aging rack is indicated by three states: Wait (WAIT), Running (RUN), and Aging Complete (FINISH). |
| ③ | Set the time: the total aging duration for this layer, in minutes |
| ④ | Time Remaining: The current remaining test time for this level, in minutes, displayed as a real-time countdown |
| ⑤ | Start the aging test for the corresponding layer; this is effective only in standby mode. |
| ⑥ | Stop the aging test for the corresponding layer; an emergency shutdown is possible during operation, and the remaining time will be preserved after the shutdown. |
| ⑦ | Resets the cumulative test time for the corresponding layer and returns the system to standby mode. This operation must be performed after clicking STOP to stop the machine. |
| ⑧ | Return to the Previous Screen |
| ⑨ | Switch (Pulse) Settings Screen |
| ⑩ | Aging Parameter Settings Interface |
| ⑪ | Switch to the Level 2 control interface; its functions are the same as those of the Level 1 control interface. |
| 1 | Switch to the Level 3 control interface; its functions are the same as those of the Level 1 control interface. |
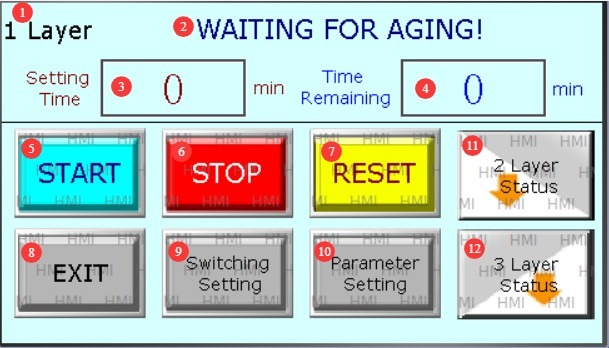
Gambar 12
4.3 Switch (Pulse) Settings Screen
| Jumlah | Note |
| ① | Row 1: Aging Parameter Settings for the First Layer of the Aging Rack |
| ② | Row 2: Aging parameter settings for the second-level aging rack |
| ③ | Row 3: Aging parameter settings for the third-level aging rack |
| ④ | Column 1 represents the delay time, i.e., the warm-up time, in minutes. If set to 0, there is no warm-up; the test begins immediately after clicking “Start.” |
| ⑤ | Column 2 indicates the number of on/off cycles—the total number of times the light has been turned on and off. If set to 0, the light remains on continuously. |
| ⑥ | Column 3 shows the duration of a single activation—the length of time the light is on each time, in seconds (s). |
| ⑦ | Column 4 indicates the duration of a single shutdown—the length of time the light is off each time, in seconds; if you want the light to stay on continuously, set this value to 0. |
| ⑧ | Return to the Previous Screen |
| ⑨ | Click to select whether to perform a cyclic on/off test on the Level 1 aging rack |
| ⑩ | Click to select whether to perform a cyclic on/off test on the second-level aging rack |
| ⑪ | Click to select whether to perform a cycle on/off test on the third-level aging rack |
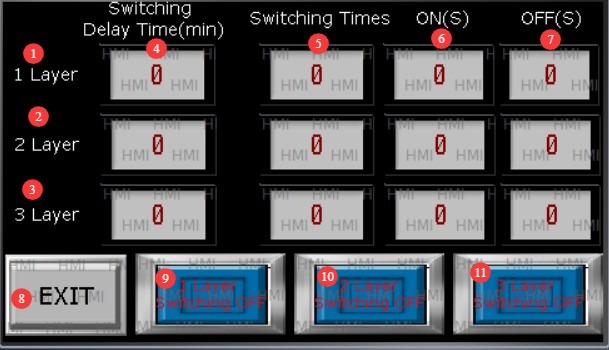
Gambar 13
4.4 Aging Parameter Settings Screen
Halaman 1:
| Jumlah | Note |
| ① | Total aging time for the aging rack on Level 1, in minutes |
| ② | Total aging time on the 2nd-level aging rack, in minutes |
| ③ | Total aging time on the 3rd-level aging rack, in minutes |
| ④ | The duration of power-on after completion; the time the light remains on after the test ends, in seconds. If set to 0, the light will turn off immediately after the test ends. |
| ⑤ | Alarm duration: The duration of the buzzer alarm after the test ends, in seconds. Set to 0 to disable the alarm. |
| ⑥ | Halaman berikutnya |
| ⑦ | Return to the Previous Screen |
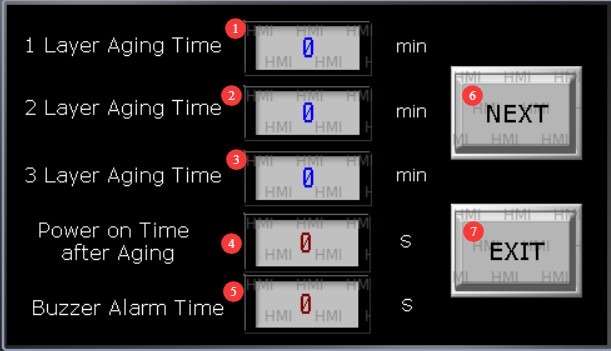
Gambar 14
Halaman 2:
| Jumlah | Note |
| ① | The first row specifies the test duration settings for high- and low-voltage testing on the first-tier aging rack. |
| ② | Row 2: Duration settings for high- and low-voltage testing of the second-tier aging racks |
| ③ | Row 3: Duration settings for high- and low-voltage testing of the third-level aging rack |
| ④ | Low-voltage test duration, in minutes; set to 0 to disable the low-voltage test |
| ⑤ | High-voltage test duration, in minutes; set to 0 to disable the high-voltage test |
| ⑥ | Return to the Previous Screen |
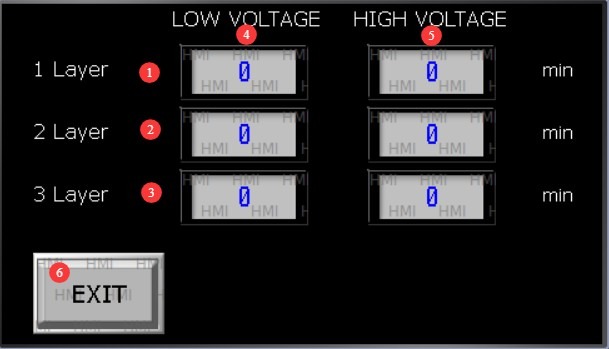
Gambar 15
Note: For single-voltage testing, simply set the duration for the other voltage to 0; the total duration of the high- and low-voltage tests should match the total aging duration.
5. Monitoring the Aging Test Process
5.1 Pemantauan Waktu Nyata
During the test, periodically check the remaining time and operating status of each layer of the touchscreen to ensure there are no abnormalities;
Monitor the voltmeter and ammeter to ensure that the voltage and current are stable and show no significant fluctuations;
Check the operational status of the light fixture samples to ensure there are no abnormalities, such as flickering, smoke, unusual noises, or the light going out;
If you notice any abnormalities, immediately click the STOP button on the corresponding floor to stop the machine, or press the emergency stop button directly.
5.2 Temporary Actions During Testing
5.2.1 Temporary Shutdown
If you need to temporarily pause the test while it is running, click the STOP button for the corresponding floor. The test will pause, and the remaining time will be saved. Click START again to resume the test.
5.2.2 Parameter Adjustment
Under no circumstances should you modify parameters during the test. If adjustments are necessary, first click STOP to halt the test, then navigate to the corresponding settings screen to make changes, and restart the test once the changes are complete.
6. Prosedur Pasca-Ujian
6.1 Handling the Natural End of a Test
6.1.1 Confirmation of End State
When the total aging duration countdown for a given layer ends, the layer’s status changes to “Aging Complete” (FINISH), and the device’s operational status indicator turns red;
If an alarm sound is set, the buzzer will sound for the set duration; once the alarm ends and the power-on period expires, the light will automatically turn off;
Verify that the touchscreen displays 0 for the remaining time on that level; the test is complete.
6.1.2 Removal of the luminaire sample
After confirming that the lights on the corresponding floor have been turned off, click the RESET button for that floor to clear the test data and return to standby mode;
Turn off the power switch for that layer to ensure there is no voltage output;
Carefully remove the tested lamp samples, label them properly to prevent damage, and organize the test data.
6.2 Testing Manual Termination Handling
6.2.1 Manual Shutdown Procedure
If you need to terminate the test early, click the STOP button on the corresponding level’s monitoring interface; the equipment will shut down immediately and the lights will turn off (if a post-test power-on duration has been set, it will be executed as configured).
6.2.2 Parameter and Status Reset
After manually stopping the test, click the RESET button to clear the cumulative test time and remaining time for that level, restoring the device to standby mode to facilitate subsequent retests.
6.3 Powering Off and Resetting the Entire System
6.3.1 Resetting The Voltage Regulator
After testing all stages, slowly turn the low-voltage and high-voltage Voltage Regulators to the zero position (all the way to the left) and verify that the voltmeter reads 0 V.
6.3.2 Tiered and General Power Shutdown
Turn off all circuit breakers;
Turn the touchscreen power switch to the left to turn off the touchscreen;
Press the main power switch on the device to turn off the power.
6.3.3 Equipment Organization
Use a clean, dry cloth to wipe down the fixtures and lamp holders, removing any dust or stains left on the lamps;
Tidy up the cables around the equipment, put the power cord back in its place, and clean the equipment;
Record all parameters, sample information, and test results from this test, and file them for future reference.
7. Pemeliharaan dan Perawatan Peralatan Harian
7.1 Routine Maintenance (Daily/After Each Test)
7.1.1 Pembersihan Peralatan
After turning off the power, use a clean, dry cloth to wipe down the surface of the device, the control panel, and the touchscreen to remove dust and fingerprints;
Wipe down the light fixture mounts, lamp sockets, and terminal blocks to remove any residual dust or metal debris and ensure good contact;
Remove any debris from the bottom and around the device, and keep the ventilation openings clear.
7.1.2 Inspection of Basic Components
Check that the fixtures and lamp holders on each layer are not loose or damaged, and that the contact springs are not oxidized or deformed;
Check that switches, knobs, and buttons turn and press smoothly, with no sticking or malfunctioning;
Check that the power cord and grounding wires are not loose or damaged, and that the terminals are not oxidized.
7.2 Deep Maintenance (Once a Month)
After turning off the power, open the door of the electrical control cabinet on the front panel of the equipment and use dry, clean compressed air to blow out the interior of the electrical control cabinet to remove dust and debris, thereby preventing short circuits caused by dust buildup;
Wipe down the wiring and terminal blocks inside the electrical control box with a dry cloth; do not use liquids for cleaning.
8. Pemecahan Masalah dan Penyelesaian Masalah Umum
8.1 Perangkat tidak mau menyala
| Gejala Kesalahan | Kemungkinan penyebab | Prosedur |
| After turning on the main power switch for the aging rack, the aging rack does not respond. | Power outage or tripping of the ground fault circuit interrupter (GFCI); 2. Blown fuse | 1. Check whether the external power supply is functioning properly and whether the ground-fault circuit interrupter (GFCI) has tripped. If it has tripped, resolve the short circuit before resetting it. Refer to Section 2.1 to verify whether the GFCI’s rating meets the equipment’s requirements; if not, replace it;2. Open the door of the aging rack’s electrical control cabinet and check whether the fuse has blown; replace it with a fuse of the same specification. |
8.2 Operational Faults
8.2.1 The sample luminaire does not illuminate
| Gejala Kesalahan | Kemungkinan penyebab | Prosedur |
| After starting the aging test, none of the lamps in the entire layer lit up | The power switch for the corresponding layer is not turned on; 2. The Voltage Regulator has not been adjusted, or the voltage is 0 | 1. Check whether the circuit breaker is turned on; if not, turn it on; 2. Verify that the Voltage Regulator has been turned to the set voltage value and that the voltmeter is displaying a normal reading. |
8.2.2 Unable to Start Aging Test
| Gejala Kesalahan | Kemungkinan penyebab | Prosedur |
| The START button is not functioning (pressing START in standby mode produces no response; the test cannot be started; or an alarm sounds immediately upon activation) | Total aging duration is not set or is set to 0; 2. Conflicting test parameter settings | 1. Go to the aging parameter settings screen and reset the total aging duration (to a non-zero value); 2. Check whether the sum of the high- and low-voltage test durations matches the total aging duration and whether the cycle switch parameters are set appropriately; make corrections and try again. |