
 Inggris
 中文简体
中文简体 Русский
 Español
 Português
 Türkçe
 العربية
 Deutsch
 Polski
 Italiano
 Français
 한국어
한국어 ไทย
ไทย Tiếng Việt
 日本語
日本語





























Sumber Listrik AC Gelombang Sinus Murni
Pengguna manual
berlaku LISUN Model: LSP-1KVARC,LSP-1KVARC-Pst,LSP-500VARC,LSP-500VARC-Pst
1. Pemahaman Dasar tentang Peralatan
1.1 Spesifikasi Teknis Utama
| Spesifikasi/Nomor Model | LSP-500VARC | LSP-500VARC-Pst | LSP-1KVARC | LSP-1KVARC-Pst |
| Tegangan Output | Single-phase: 2 V–150 V / 2 V–300 V | |||
| Arus Keluaran Maksimum | 4.2A (2V–150V), 2.1A (2–300V) | |||
| Frekuensi Output | 45.00–65.00 Hz | |||
| Total Distorsi Harmonic | ≤0.3% (no-load or at full resistive load) | |||
| Equivalent Internal Resistance | ≤0.1 Ω (zero-resistance design) | |||
| Akurasi saat ini | ±(0.02% of reading + 0.01% of range + 1 digit) < 5 A; ±(0.03% of reading + 0.02% of range + 1 digit) ≥ 5 A | |||
| Resolusi Tegangan | 0.1 V | |||
| Resolusi Saat Ini | Para 0.001 | |||
| Parameter Tampilan | Voltage, Current, Power, Power Factor, Frequency | |||
| Catu daya masukan | Single-phase AC 110 V/220 V, 50/60 Hz | |||
1.2 Verifikasi Konfigurasi Peralatan
1.2.1 Membongkar
Saat membuka kemasan perangkat, tangani dengan hati-hati untuk menghindari goresan pada casing luar dengan alat tajam. Setelah membuka kemasan, periksa terlebih dahulu bagian luar perangkat untuk memastikan tidak ada deformasi atau penyok yang terlihat, dan tombol-tombolnya tidak rusak atau longgar. Jika Anda melihat kelainan pada perangkat atau aksesorinya, jangan menyalakannya. Segera hubungi kami.
1.2.2 Unit Utama dan Aksesoris
| Jumlah | Note |
| ① | LSP Series Power Supplies |
| ② | Kabel Listrik |
| ③ | RS232/RS485 Communication Cables |
| ④ | Sekering Cadangan |
1.2.3 Mengunduh Dokumen Elektronik
Tautan unduhan untuk manual pengguna digital, perangkat lunak, kartu garansi, dan materi lainnya telah dikirim melalui email. Silakan unduh sesegera mungkin. Jika Anda melewatkan email tersebut, jangan ragu untuk menghubungi kami untuk meminta tautan unduhan lagi.
Catatan: Keduanya LISUN spectroradiometer and goniophotomoeter software can control the LSP series power supplies; this manual covers only the operation of the power supply-specific software.
2. Tindakan Pencegahan Keamanan
2.1 Standar Keselamatan Listrik
Input power supply single-phase AC 110 V/220 V ±10 V, 50/60 Hz. It must comply with safety standards and be equipped with a proper protective grounding system, with a protective grounding resistance of ≤4 Ω, to prevent electric shock.
Note: The rear panel of the LSP series power supplies features an input voltage selector switch. See Section 3.2. Please take note!
2.2 Environmental Safety Standards
For indoor use only; avoid direct sunlight. Place on a sturdy, stable surface to prevent excessive vibration. Ensure the environment is free of dust, corrosive gases, and flammable or explosive materials. Keep away from strong magnetic and electric fields. Ensure adequate ventilation; leave at least 10 cm of clearance around the device for heat dissipation, and do not block the cooling fan vents. Operating Environment: Temperature 5°C to 35°C, relative humidity ≤65% RH.
2.3 Pedoman Keselamatan Operasional
Do not operate the equipment or plug in/unplug the power cord with wet hands; the output must be turned off before connecting or disconnecting wires; allow the unit to warm up for at least 10 minutes after powering on before enabling the output; Do not touch the output terminals, internal components, the load, or load wiring while the equipment is operating; allow at least 3 minutes between powering on and off to prevent damage from power surges; do not shut down the equipment directly while it is in output mode; first disconnect the output before shutting down; if you notice an unusual odor, smoke, abnormal noise, or overheating, immediately disconnect the power and do not continue operation.
3. Gambaran Umum Peralatan dan Pengkabelan
3.1 Pengantar Panel Depan
| Jumlah | Note |
| ① | Saklar daya |
| ② | The left half of the display is the display area, showing the following from top to bottom: voltage, current, power, and power factor. |
| ③ | The right half of the display is the settings area, which, from top to bottom, consists of: voltage, frequency, voltage range, starting phase, and baud rate. |
| ④ | The power output status is displayed in the lower-right corner of the screen; if a power alarm occurs, the alarm code is displayed. |
| ⑤ | The function buttons, from left to right, are: Settings, Voltage Setting, Frequency Setting, and Lock Screen. |
| ⑥ | Slider: Use it to adjust the number value; move it clockwise to increase and counterclockwise to decrease. |
| ⑦ | Use the left and right arrow keys to adjust the number’s value or the number of digits during setup. |
| ⑧ | Number keys: 0 through 9 and the decimal point |
| ⑨ | Tombol yang jelas |
| ⑩ | Tombol konfirmasi |
| ⑪ | Output Key |
| 1 | Output outlet—please connect your AC load |
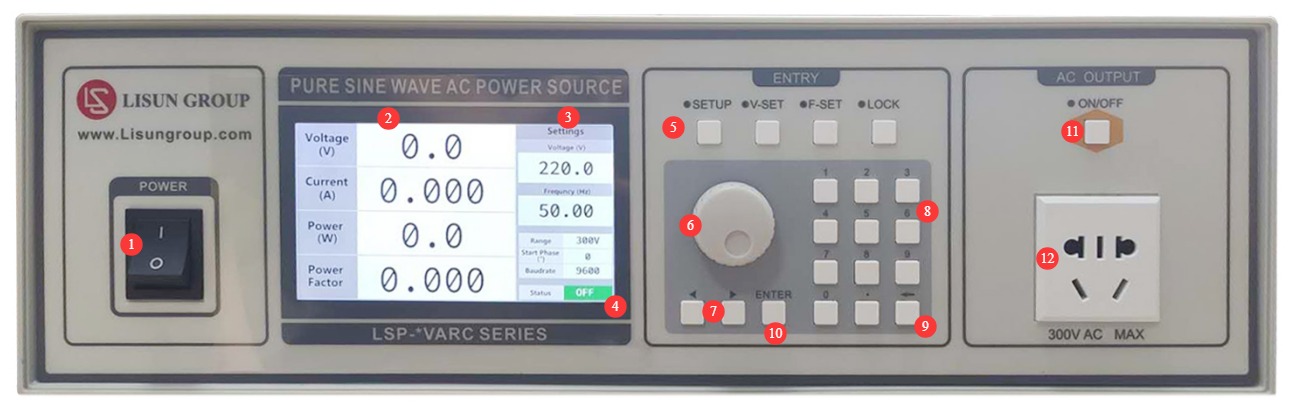
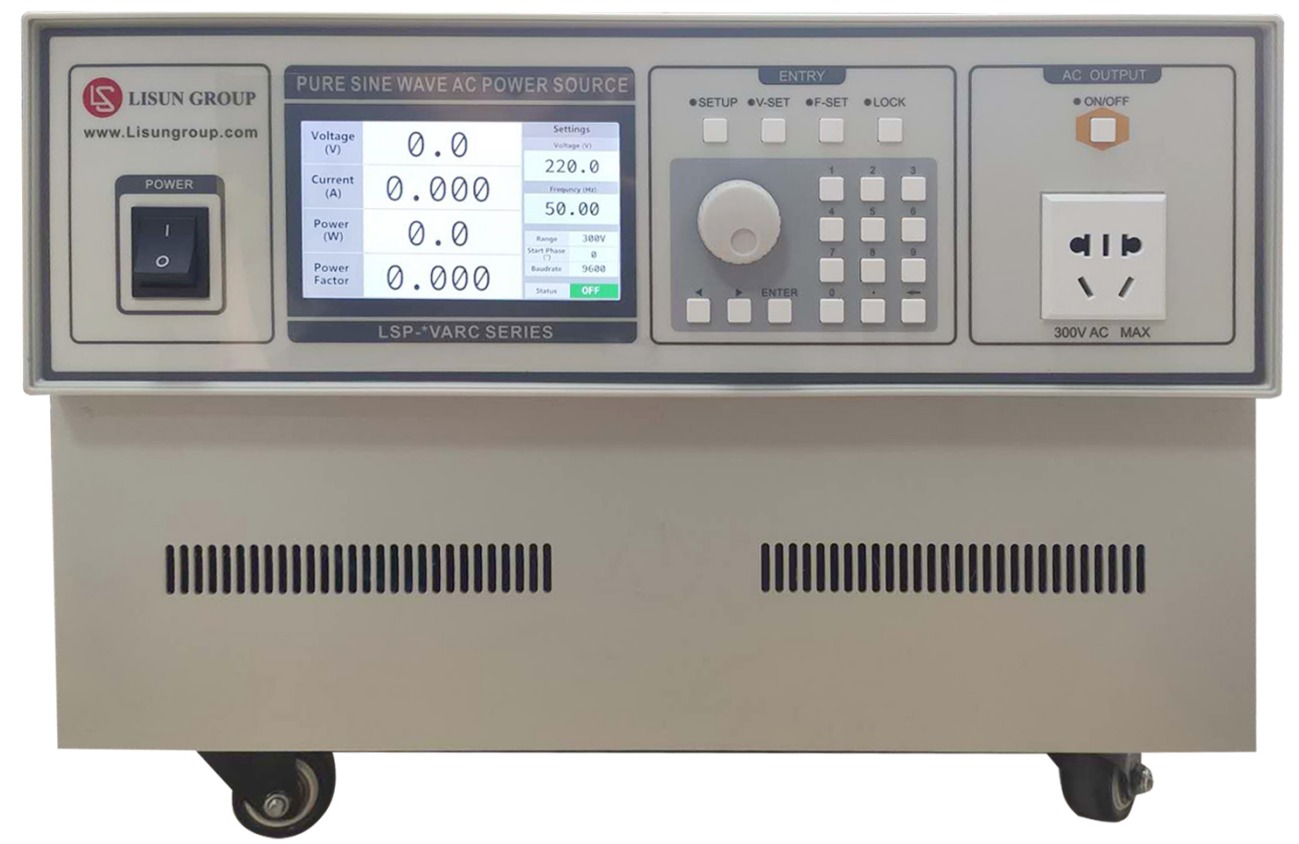
Catatan: LSP-500VARC series consists of compact power supplies; the front panel appearance is shown in the figure above. The LSP-1KVARC series consists of large power supplies; the front panel appearance is shown in the figure below. The front panel controls for both series are identical.
3.2 Pengenalan Panel Belakang
| Jumlah | Note |
| ① | Input voltage switching: The unit is set to 220V by default at the factory. Note: If the switch is set to 110V and the input is 220V, the power supply will burn out; if the switch is set to 220V and the input is 110V, the power supply will fail to start . Catatan: LSP-500VARC has one switch on the back; the LSP-1KVARC has two switches on the back, which must be set to the same position simultaneously. |
| ② | Power cord jack, for connecting the device to an appropriate power source |
| ③ | Protective grounding terminal: Internally short-circuited to the power cord’s grounding terminal. If the power cord already provides adequate protective grounding, this terminal does not need to be connected. |
| ④ | Sekering |
| ⑤ | Trigger signal interface; required when used with the LISUN LSRF-3 alat |
| ⑥ | RS232/RS485 communication port: If you need to use computer software to configure and control the power output, connect it to the computer’s communication port, or use a USB cable to connect it to the computer’s USB port. |
| ⑦ | Output jack—this functions the same as the front-panel output jack; simply connect to either one. |
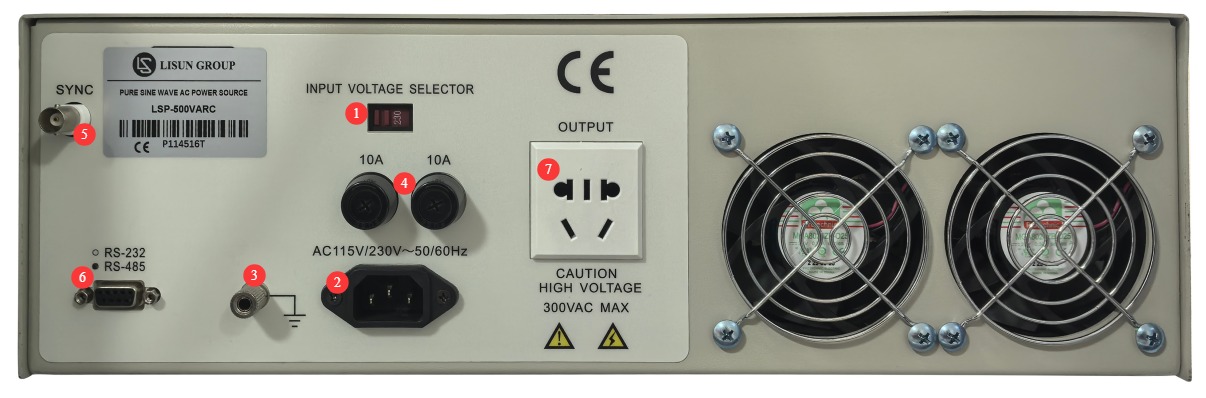
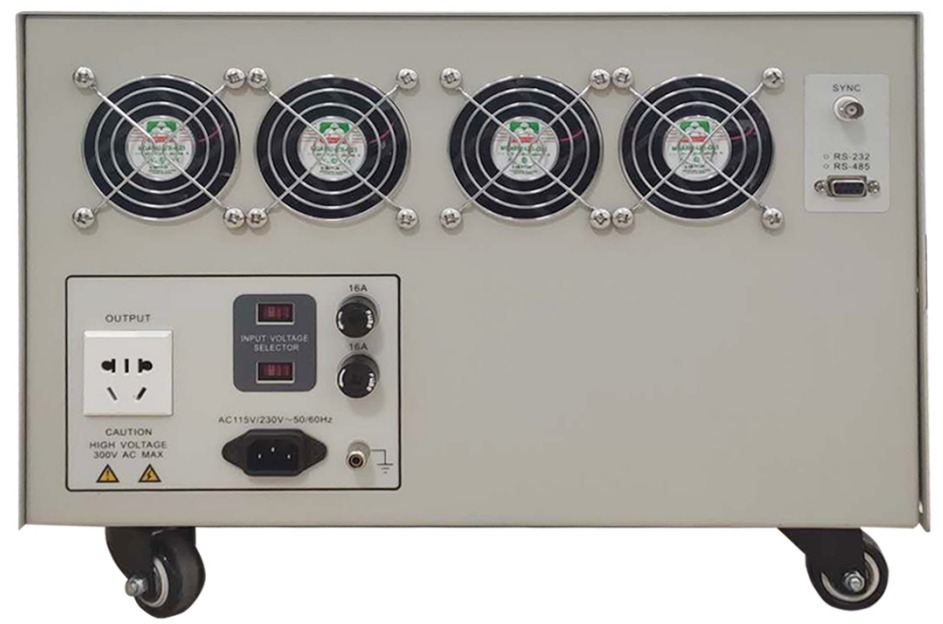
Catatan: LSP-500VARC series consists of compact power supplies; the rear panel appearance is shown in the image above. The LSP-1KVARC series consists of large power supplies; the rear panel appearance is shown in the image below. The front-panel operation is identical for both series.
4. Pengoperasian Peralatan
4.1 Persiapan
Changing the Display Language: Press and hold the number keys 1, 5, and 9 simultaneously to switch the display language between Chinese and English.
Prosedur 4.2
| petunjuk | Note |
| ① | Press the “Set” button to first set the voltage range—150 V or 300 V. You can use the knob or the left and right buttons to adjust the setting. Once set, press the “Confirm” button. |
| ② | The system automatically enters the initial phase setting, which defaults to 0°. If you have specific requirements, you can set the value between 0° and 359° using the left and right buttons and the rotary knob. Once you have made your selection, press the Confirm button. |
| ③ | The device automatically enters the baud rate settings menu. The factory default is 9600. When you need to control the device using software, set the baud rate to 9600. Use the left and right buttons and the knob to make the selection, then press the Confirm button. |
| ④ | Press the voltage setting button to set the output voltage. You can use the numeric keys to set the value directly. Once set, press the confirm button. |
| ⑤ | Press the frequency setting button to set the output frequency. You can use the number keys to set it directly. Once set, press the confirm button. |
| ⑥ | After verifying that the wiring and settings are correct, press the output button to start output. While in output mode, you can use the knob to fine-tune the output voltage; press the output button again to stop the output. |
5. Pengoperasian Perangkat Lunak
5.1 Persiapan
5.1.1 Hardware Preparation
Refer to Section 4.2 to verify that the device’s baud rate is 9600.
5.1.2 Software Preparation
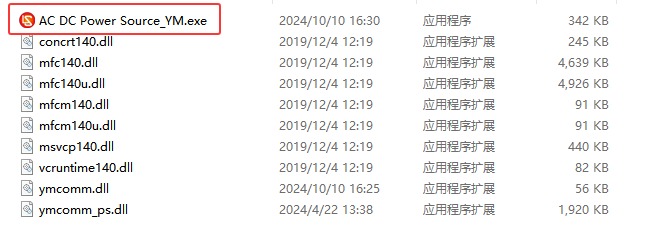
Copy the software folder to your computer. No installation is required; simply double-click the following file to open the software interface.
| Jumlah | Note |
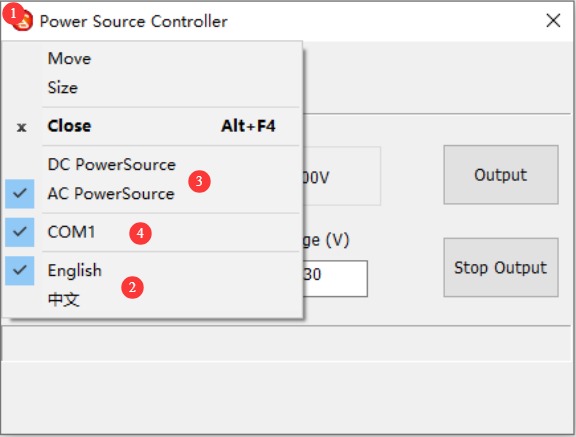
| ① | Klik yang merah LISUN logo in the upper-left corner of the software interface |
| ② | Select the display language for the software interface: Chinese or English |
| ③ | Select AC Power |
| ④ | To select the correct communication port, go to “Device Manager” on your computer to verify which communication port is being used. |
5.2 Controlling AC Power Output Using Software
| Jumlah | Note |
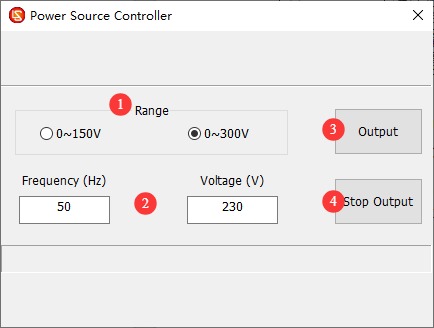
| ① | Set the voltage range |
| ② | Set the Output Frequency and Voltage |
| ③ | Click to start output |
| ④ | Click to turn off the output |
6. Pemeliharaan dan Perawatan Peralatan Harian
6.1 Perawatan Rutin
6.1.1 Pembersihan Harian
Be sure to turn off the power and unplug the power cord before cleaning. We recommend wiping the device with a soft, anti-static cotton cloth and a mild detergent; do not spray liquids directly onto the device. Do not use chemical solvents such as benzene, toluene, or acetone.
6.1.2 Pemeriksaan Rutin
Before each use, check that the power cord and terminal connections are secure and free of burn marks; ensure that the fan vents are not blocked; and after turning on the unit, verify that the indicator lights and display are functioning properly.
6.2 Spesifikasi Penyimpanan
6.2.1 Persyaratan Lingkungan Penyimpanan
Temperature: 5°C to 35°C; relative humidity: ≤65% RH; dry, dust-free environment free of corrosive gases.
6.2.2 Operasi Penyimpanan Jangka Panjang
Matikan daya dan cabut semua kabel; bersihkan peralatan dan bungkus dengan plastik anti debu; hidupkan daya selama 10 menit setiap bulan untuk mencegah kerusakan akibat kelembapan pada komponen.
7. Pemecahan Masalah dan Penyelesaian Masalah Umum
| Gejala Kesalahan | Kemungkinan penyebab | Prosedur |
| Tidak dapat menyala | Kerusakan sakelar pemilih tegangan input, sekering putus. | Periksa sakelar pemilih tegangan input; matikan daya, hilangkan korsleting atau kelebihan beban pada output, ganti sekering dengan yang memiliki nilai yang sama, dan jangan menambah nilai arus. |
| Kipasnya tidak berputar | Penumpukan debu, kerusakan motor | Matikan daya dan bersihkan debu dari kipas; jika masalah berlanjut, silakan hubungi kami untuk perbaikan atau penggantian kipas. |
| Kode kesalahan 02 di pojok kanan bawah layar. | In the event of an output short circuit, current overload, or power overload, the power supply will automatically cut off the output to protect itself. | Please turn off the LSP power supply, check the wiring, and resolve any output short circuits before turning it back on; if the load current or power exceeds the power supply’s upper limit, you will need to purchase a larger AC power supply. |
| Kode kesalahan 01 di pojok kanan bawah layar. | Sekring putus. | Please turn off the LSP power supply and unplug the power cord. Check all fuses on the rear panel of the power supply and replace them with fuses of the same rating. Do not use fuses with a higher current rating. |
8. Daftar Kemasan
| Nomor | Nama | Jumlah |
| ① | LSP Series Power Supply Units | Unit 1 |
| ② | Kabel Listrik | Sepotong 1 |
| ③ | RS232/RS485 Communication Cables | |
| ④ | Sekering Cadangan | 2 |