
 Inggris
 中文简体
中文简体 Русский
 Español
 Português
 Türkçe
 العربية
 Deutsch
 Polski
 Italiano
 Français
 한국어
한국어 ไทย
ไทย Tiếng Việt
 日本語
日本語





























Kotak Tetes
Pengguna manual
berlaku LISUN Model: JL-12
1. Membuka Kemasan dan Mengenal Peralatan Secara Dasar
1.1 Spesifikasi Teknis Utama
| Parameter Teknis | Note |
| Tingkat Ketahanan Air yang Terukur | IPX1 dan IPX2 |
| Drip Tray Dimensions | 800 × 800 × 45 mm (P × P × T) |
| Diameter Lubang Tetesan | 0.4 mm |
| Drip Hole Spacing | 20 mm |
| Kapasitas Beban Maksimum Meja Putar | 50 kg |
Note: The drip tray and test turntable can be customized based on the maximum dimensions and weight of the test object.
Peralatan ini memenuhi persyaratan pengujian untuk IPX1 dan IPX2 yang ditentukan dalam GB/T 4208-2017, Bagian 14.2.1–14.2.2 dan Gambar 3.
1.2 Membuka Kemasan dan Memeriksa Isinya
1.2.1 Membuka Kemasan dan Pemeriksaan Visual
Saat membuka kemasan perangkat, tangani dengan hati-hati untuk menghindari goresan pada casing dengan alat tajam. Setelah membuka kemasan, periksa terlebih dahulu bagian luar perangkat untuk memastikan tidak ada deformasi atau penyok yang terlihat, dan tombol-tombolnya tidak rusak atau longgar. Jika Anda melihat kelainan pada perangkat atau aksesorinya, jangan menyalakannya. Segera hubungi kami.
1.2.2 Unit Utama dan Aksesoris
Komponen utama:
| Nomor | Note |
| ① Drip tray | Includes a lifting motor, drip tray, etc. |
| ② Control Cabinet | Includes electrical cabinets, touchscreens, etc. |
| ③ Turntable | Mount the sample; it will rotate automatically during testing. |
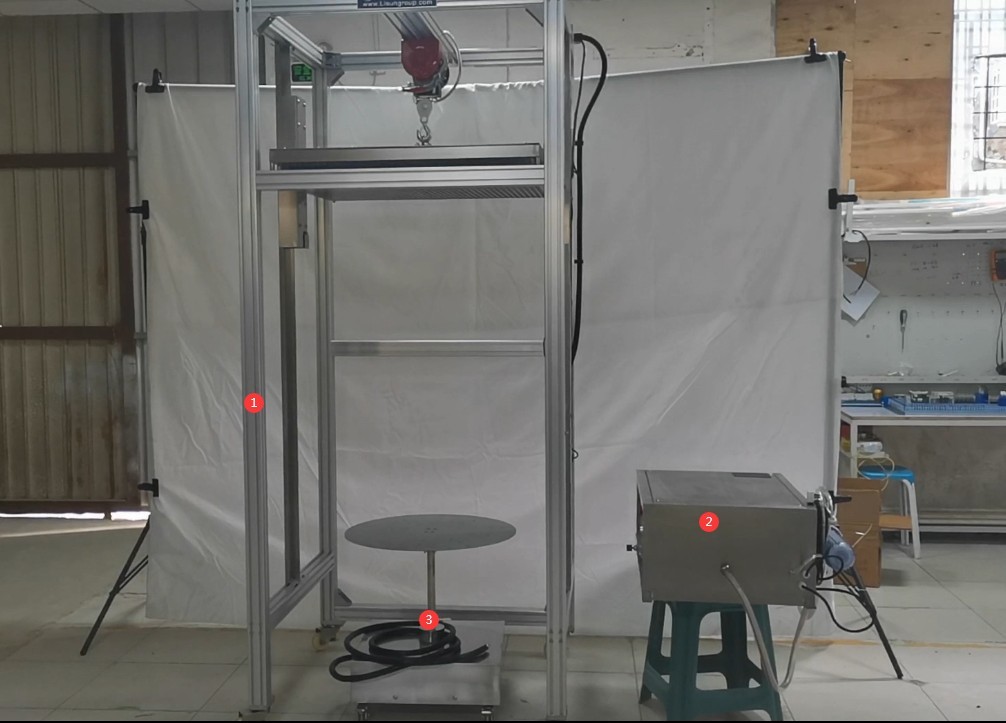
Gambar 1
Other Major Components:
| Nomor | Note |
| ① Waterproof outlets and plugs | Used to connect the turntable to the sample during electrical testing |
| ② Straps | Can be used to secure samples |
| ③ Spare copper nozzle | Used to connect the drip tray to the needle; the drip tray already has enough copper fittings, so this is a spare. |
| ④ Spare needles | There are already enough needles on the drip tray; these are spares. |
| ⑤ Hex key | For use when installing control cabinets |
| ⑥ Needle Passing | If the needle becomes clogged, use this to clear it |
| ⑦ Filter Wrench | Use when replacing the filter cartridge |
| ⑧ Spare Filter Cartridge | The unit is already equipped with a filter cartridge; this is a spare. |
| ⑨ Inlet Pipe | Used to connect the water supply to the control cabinet of the Drip Box |
| ⑩ Outlet Pipe | Used to connect the control cabinet to the drip tray |
| ⑪ Clamp | Secure the hoses when installing the inlet and outlet hoses |
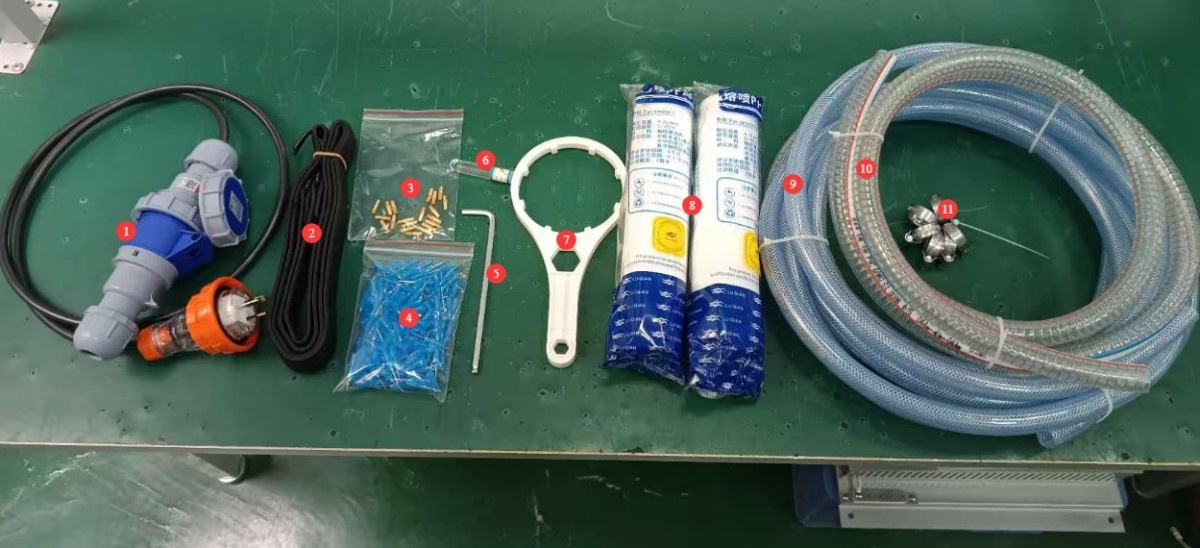
Gambar 2
Tautan unduhan untuk manual pengguna elektronik, perangkat lunak, kartu garansi, dan materi lainnya telah dikirim melalui email. Silakan unduh sesegera mungkin. Jika Anda melewatkan email tersebut, jangan ragu untuk menghubungi kami untuk meminta tautan unduhan lagi.
2. Tindakan Pencegahan Keamanan
2.1 Keamanan Listrik
2.1.1 Spesifikasi Koneksi Daya
Based on the nameplate, connect the test chamber to the correct power source, typically 220 V, 50 Hz (60 Hz available upon request), and ensure the voltage and frequency are correct. Please use a dedicated circuit to avoid sharing the circuit with other high-power equipment. Verify that all connections are secure and free of looseness.
2.1.2 Persyaratan Pembumian
The test chamber must be reliably grounded, with a grounding resistance of ≤4 Ω. Do not use gas pipes, non-metallic water pipes, or the neutral wire as a substitute for the grounding wire. After grounding is complete, use a Grounding Resistance Tester to measure the ground resistance. Power may only be applied after confirming that the resistance meets the requirements to prevent electric shock, test chamber malfunctions, or measurement errors caused by poor grounding.
2.1.3 Electrical Operation Contraindications
Before wiring, servicing, or maintaining the test chamber, you must disconnect the main power supply and confirm that there is no residual voltage before proceeding;
Jangan mengoperasikan sakelar daya ruang uji, layar sentuh, atau tombol instrumen dengan tangan basah untuk menghindari risiko sengatan listrik;
Jangan meletakkan benda asing apa pun (seperti perkakas atau kertas) di dalam kabinet kontrol listrik untuk mencegah debu atau benda asing menyebabkan korsleting atau merusak komponen;
Do not plug in or unplug power cords or signal cables while the test chamber is running, to prevent short circuits that could damage the controller or electrical components.
2.2 Keselamatan Operasional
When the drip tray is being raised or lowered, do not touch the drip tray, the lifting motor, the steel cables, or any other parts to avoid danger;
During testing, entry into the test area is prohibited, and touching the turntable or samples is prohibited. If maintenance is required, testing must be stopped, and the power and water supply must be shut off before proceeding;
If the test chamber malfunctions, non-professionals are prohibited from disassembling or repairing it; contact LISUN Customer Service or operate the equipment under the guidance of a technician.
2.3 Keselamatan Lingkungan
The distance between the drip tray and the wall, as well as surrounding equipment (such as other test equipment and shelves), shall be at least 1500 mm to facilitate operation and maintenance;
The drip rack must be placed on a sturdy, level surface. Use a level to ensure it is level, making sure the bubble in the level is centered. If the unit is tilted, it may cause the drip tray to jam when raising or lowering it, result in uneven dripping, or even damage the equipment. Note: The legs of the drip rack are adjustable to ensure the unit is level.
2.4 Lainnya
Untuk hal-hal yang tidak tercakup dalam panduan ini, harap berhati-hati atau hubungi kami.
3. Equipment Assembly and Startup
3.1 Installing the Control Cabinet
There are four pre-drilled screw holes and four screws on the side of the drip tray; simply mount the control cabinet in the corresponding position.
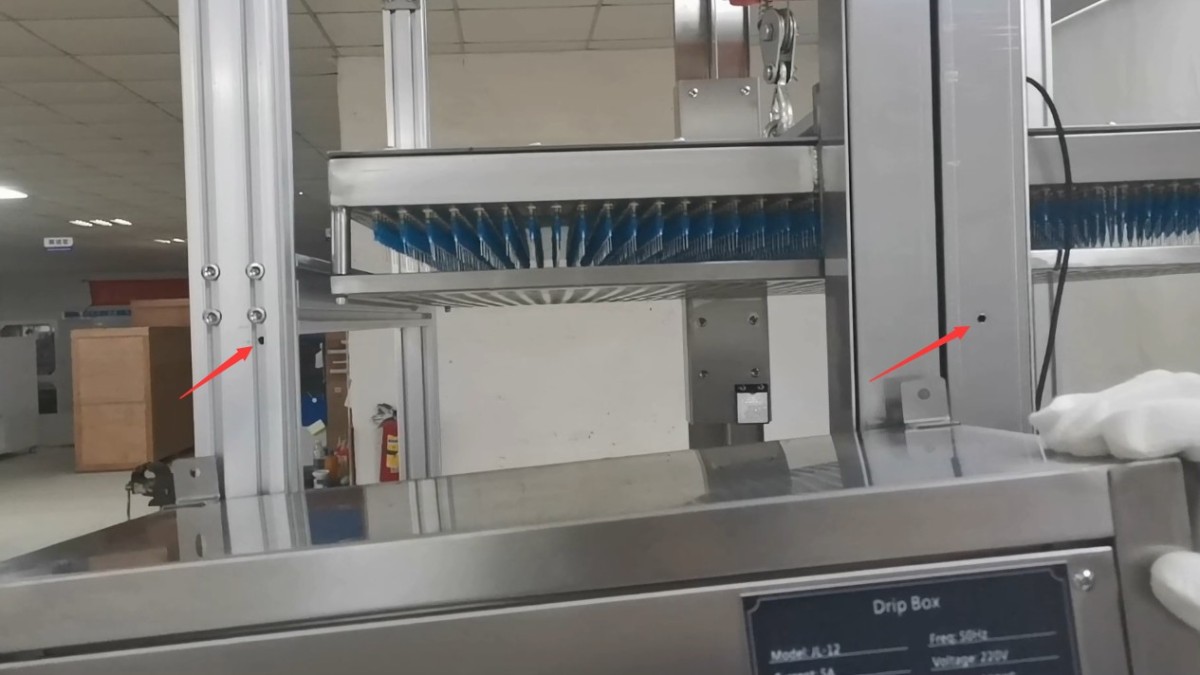
Gambar 3
3.2 Cable Connections
| Nomor | Note |
| ① | Connect the turntable’s cable to the control cabinet |
| ② | Connect the cable from the lifting motor at the top of the drip rack to the control cabinet |
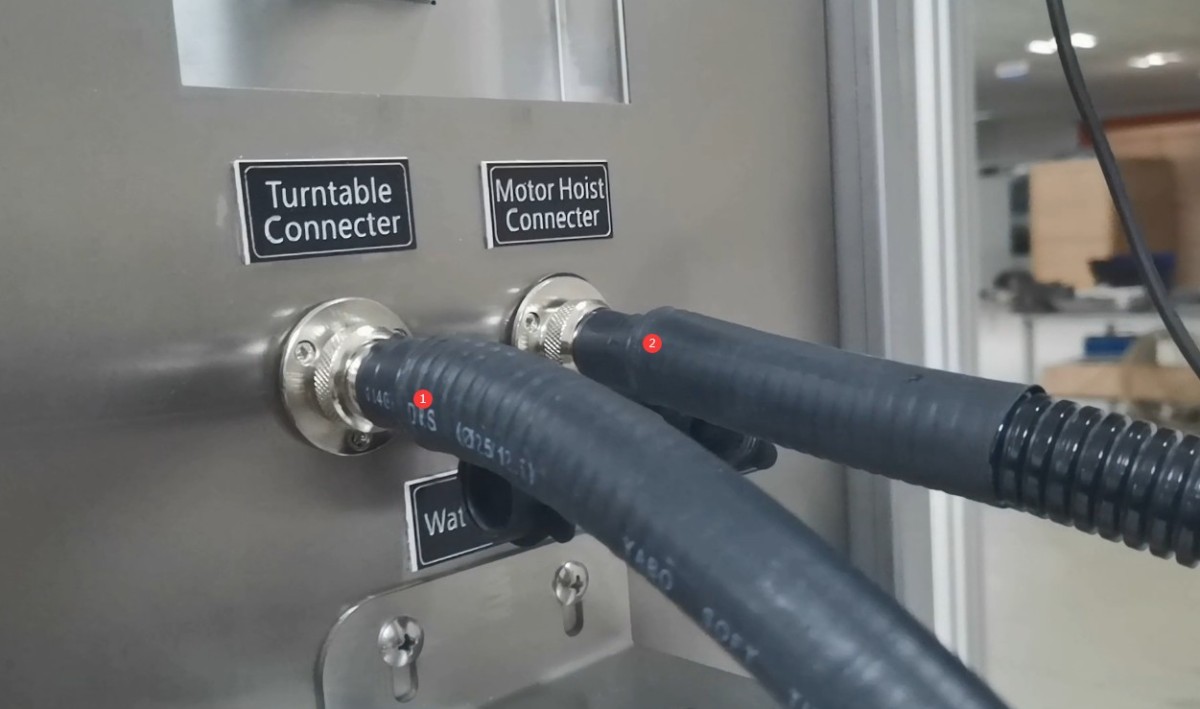
Gambar 4
3.3 Air Compressor Connection (if applicable)
Air line connections at the bottom of the control cabinet. If your company has an air compressor, you can connect this hose to the air compressor (supply pressure: 0.3–0.8 MPa). After testing is complete, you can use the air compressor to remove any residual water from the drip tray.
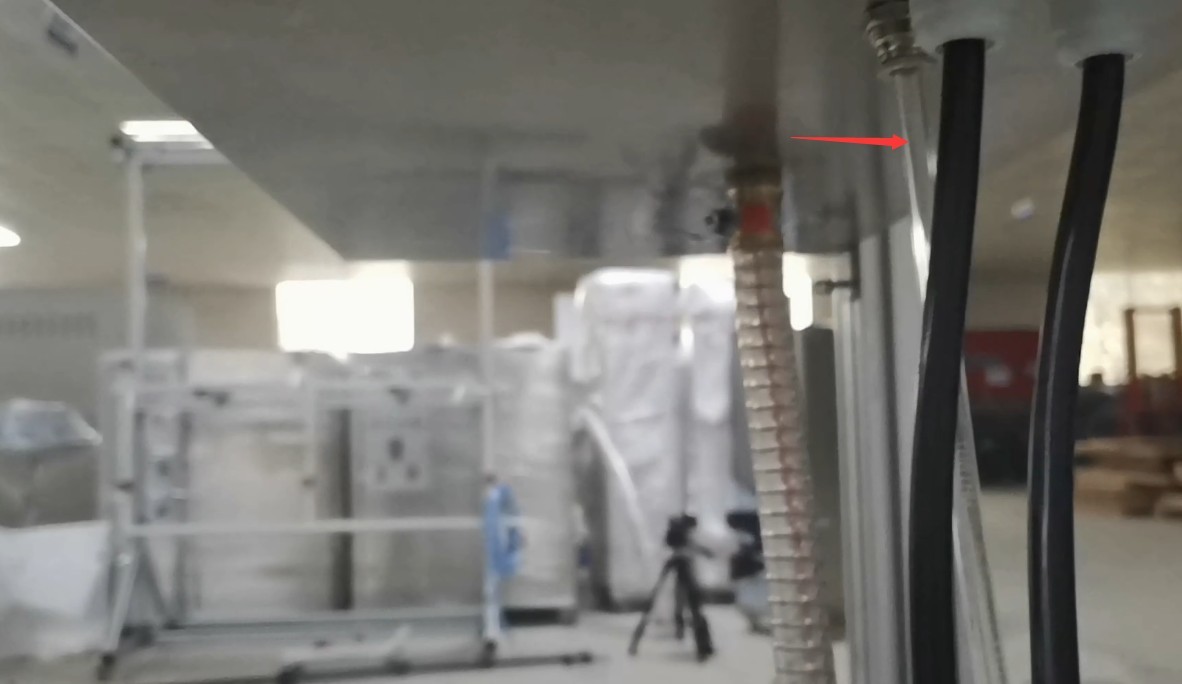
Gambar 5
Note: Not connecting the air compressor does not affect the equipment’s foundation drip test function.
3.4 Sambungan Pipa Air
3.4.1 Inlet Pipe Connection
Simply connect the filter’s inlet to a faucet. The IPX1 and IPX2 water resistance tests do not require a water pump; normal faucet water pressure is sufficient.
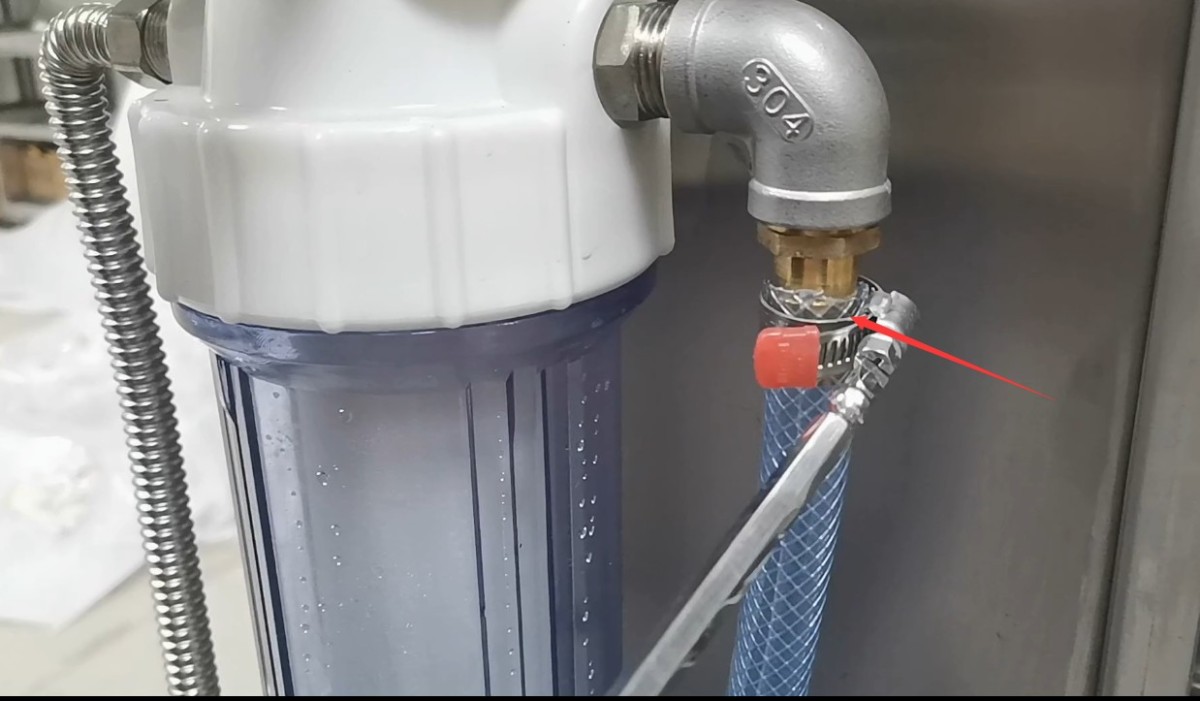
Gambar 6
Note 1: The water inlet faucet may remain open. Once the equipment is started, the program uses a solenoid valve to control whether water is fed into the drip tray. At the end of the day’s testing, simply close the water inlet faucet.
Note 2: We recommend using deionized water or purified water (a water purifier may be used); if tap water containing high levels of minerals and impurities is used, it may cause scale buildup, which can affect the test water flow rate and may require frequent filter replacement and needle cleaning.
3.4.2 Outlet Pipe Connection
Connect the control cabinet’s outlet pipe to the connection point above the drip tray.
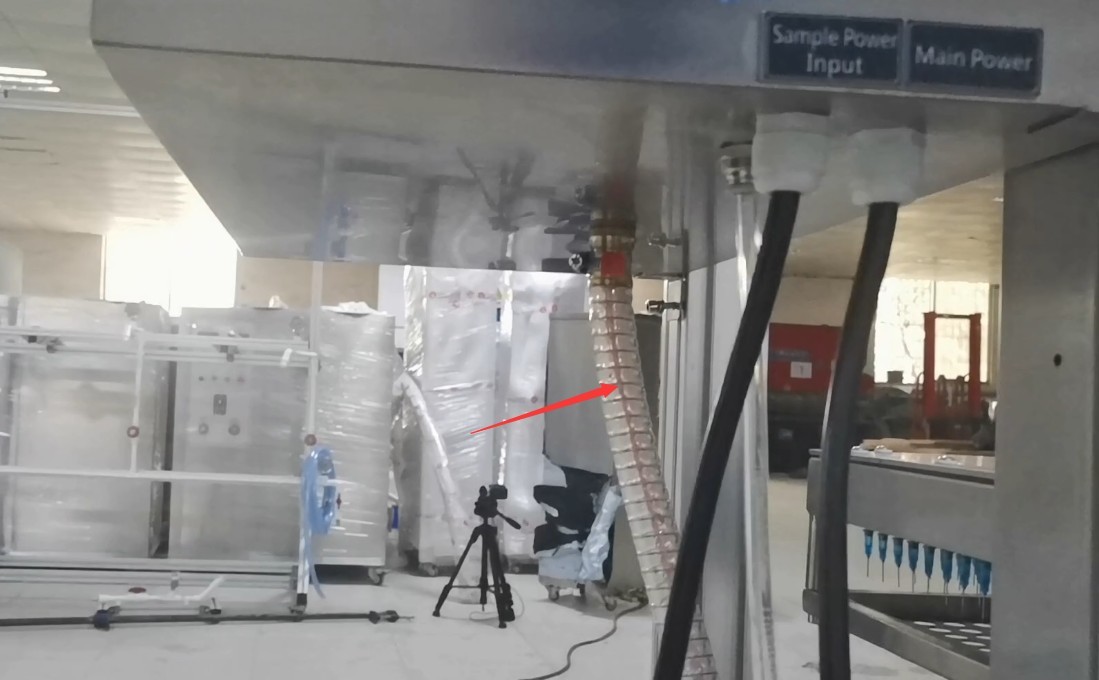
Gambar 7
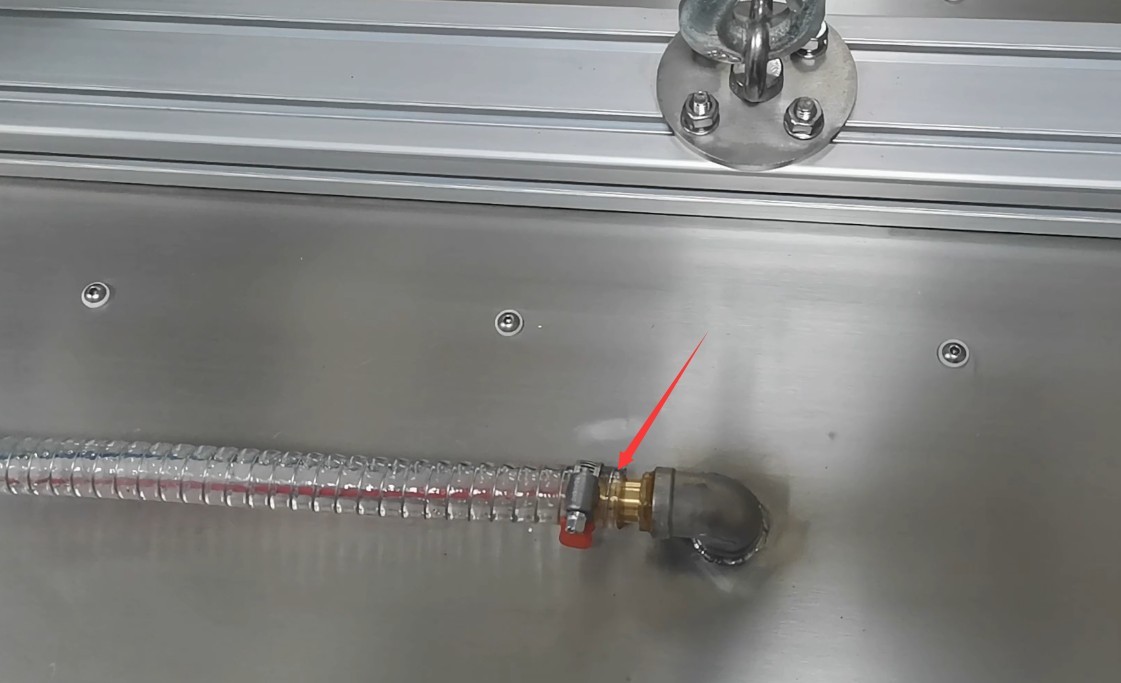
Gambar 8
Note: If the drip tray is too high to connect easily, refer to Section 4.1.3 to lower the drip tray before connecting the drain pipe.
3.5 Menghubungkan Kabel Daya
| Nomor | Note |
| ① Sample power cord | Please connect the sample to an appropriate power source. Note: Abnormal conditions, such as short circuits, may occur in the sample during testing; you may connect an external ground-fault circuit interrupter here. |
| ② Main Power Supply for the Equipment | Harap sambungkan perangkat ke sumber daya yang sesuai berdasarkan informasi yang tertera pada pelat nama. |
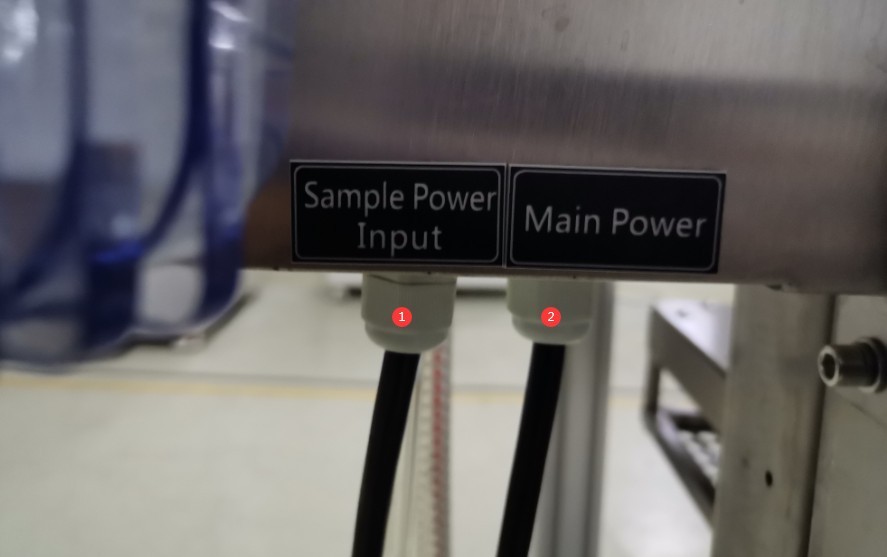
Gambar 9
Once everything is assembled, it will look like the image below.
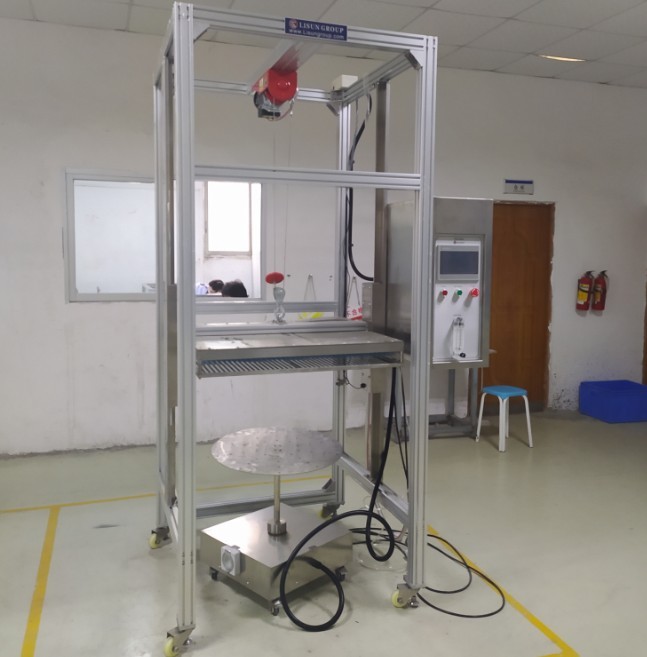
Gambar 12
After verifying that all connections are correct, turn on the device.
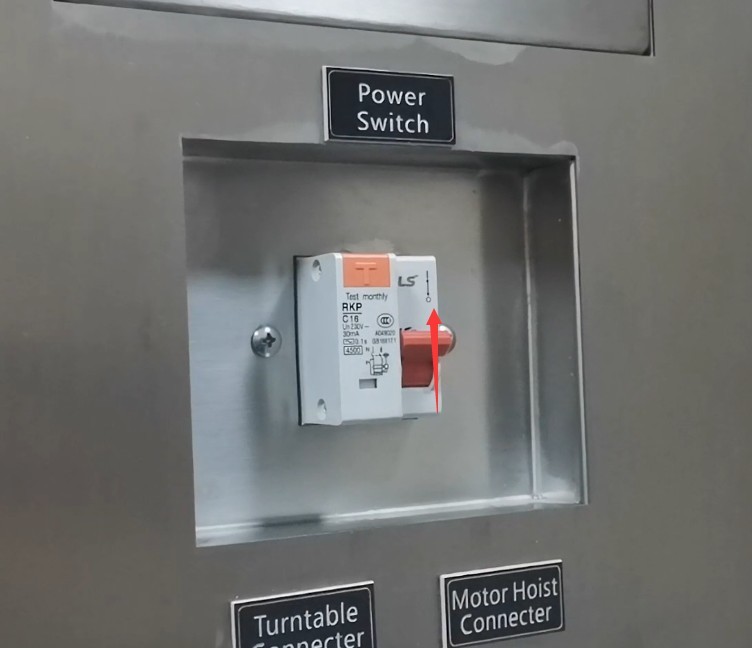
Gambar 10
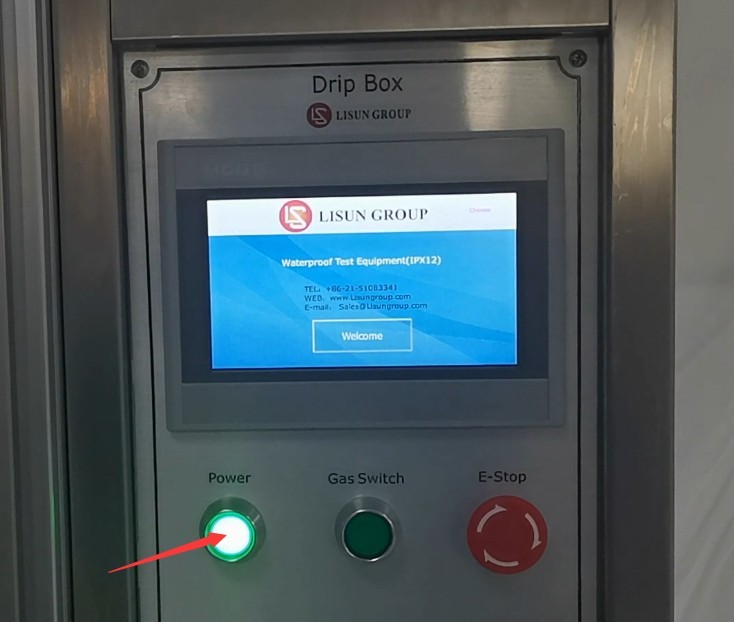
Gambar 11
4. Pengantar Program Layar Sentuh
4.1 Komponen Antarmuka Utama Program
4.1.1 Antarmuka Pengguna
| Nomor | Note |
| ① Peringkat ketahanan air: IPX1 | Setelah dipilih, Anda dapat mengkonfigurasi parameter uji IPX1 dan melakukan uji tetesan air IPX1. |
| ② Peringkat ketahanan air: IPX2 | Setelah dipilih, Anda dapat mengkonfigurasi parameter uji IPX2 dan melakukan uji tetesan air IPX2. |
| ③ Test Parameters | Klik untuk mengakses layar pengaturan parameter pengujian. |
| ④ Factory Settings | Saat peralatan beroperasi normal, tidak perlu masuk ke mode debug. Jika parameter pengujian peralatan tidak normal, Anda dapat masuk ke mode debug. Diperlukan kata sandi; silakan hubungi kami. |
| ⑤ Manual Window | Sebelum pengujian resmi, Anda dapat memeriksa apakah semua fungsi perangkat bekerja dengan benar di jendela manual. |
| ⑥ The drip tray rises | Press to raise the drip tray for easy sample installation. The drip tray is equipped with a limit stop and will rise no higher than the upper limit stop. |
| ⑦ The drip tray lowers | Press this button to lower the drip tray. The drip tray is equipped with an infrared sensor and will automatically lower to a position 200 mm from the sample to meet the test height required by the standard. |
| ⑧ Sample Power Supply | Daya sampel dapat dihidupkan atau dimatikan. Saat daya sampel dihidupkan untuk pengujian, program akan secara otomatis memasok daya ke sampel sesuai dengan waktu hidup/mati sampel yang telah diatur di antarmuka pengaturan parameter. |
| ⑨ Hapus dan Atur Ulang | Sebelum memulai tes, klik di sini untuk menghapus data dari tes sebelumnya. |
| ⑩ Percobaan Dimulai | Click to start the water droplet test |
| ⑪ Tes Dihentikan | Klik untuk menghentikan uji tetesan |
| ⑫ Tampilan Durasi Tes | Tampilkan durasi pengujian saat ini |
| ⑬ Tampilan Alur Standar | Displays the required standard water flow rate under the current standard |
| ⑭ Sample Exposure Time | Tampilkan durasi penyalaan daya saat ini untuk sampel tersebut. |
| ⑮ Sample power-off time | Display the duration of power interruption for the current sample |
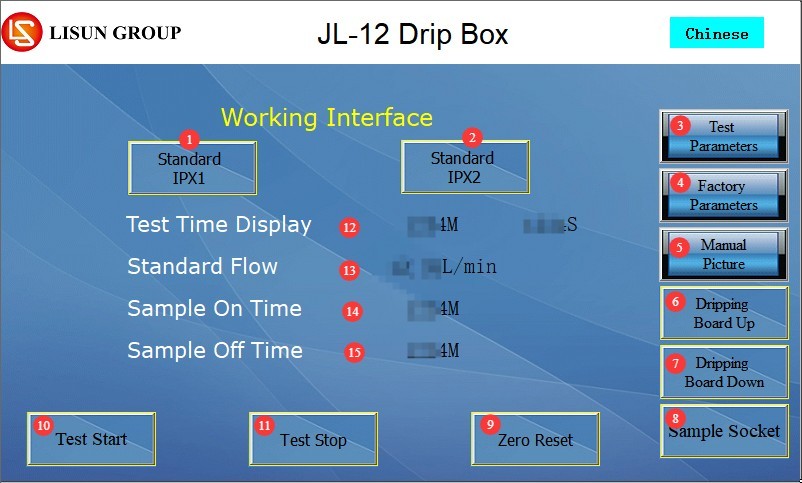
Gambar 15
4.1.2 Antarmuka Pengaturan Parameter
| Nomor | Note |
| ① Durasi Tes | Durasi pengujian total dapat diatur; standar GB/T 4208-2017 menetapkan bahwa durasi pengujian untuk IPX1 dan IPX2 adalah 10 menit. |
| ② Kecepatan Meja Putar | Only IPX1 can be configured; the standard is 1 r/min, with a customizable range of 0–5 r/min. IPX2 cannot be configured; rotation during testing is performed automatically according to the standard. Catatan: Selama pengujian IPX1, untuk sampel yang memerlukan daya untuk diuji, meja putar akan secara otomatis berputar ke kedua arah untuk mencegah kabel daya sampel kusut. |
| ③ Waktu sampel diberi energi | Set the duration of continuous power supply to the sample during the test, in minutes |
| ④ Time the sample is without power | Set the duration of the power outage for the sample during the test, in minutes |
| ⑤ Turntable Interval Time | Applies to IPX2. According to the standard, set the duration to 150 seconds, which means 2.5 minutes per angle, for a total of 10 minutes across all four angles. |
| ⑥ Kembali | Klik untuk kembali ke antarmuka kerja. |
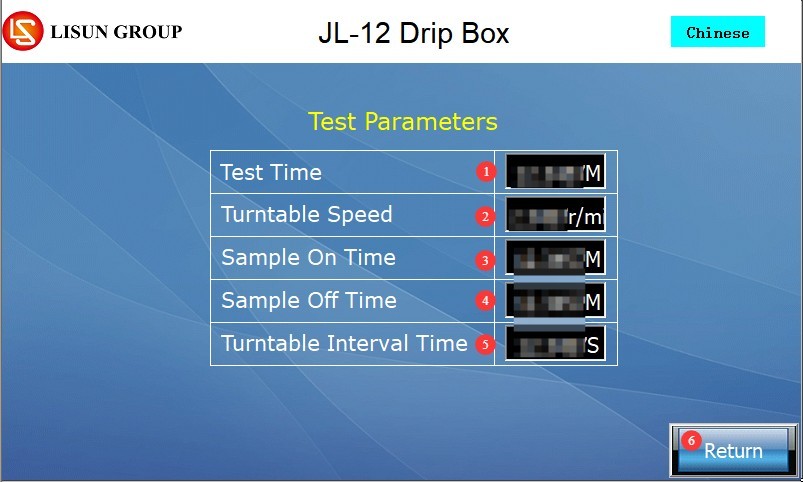
Gambar 16
Catatan: Catu daya terus menerus: Waktu menyala = durasi pengujian; waktu mati = 0 menit; Tanpa catu daya: Waktu menyala = 0 menit; waktu mati = durasi pengujian.
4.1.3 Jendela Manual
| Nomor | Note |
| ① Drip Solenoid Valve | The water inlet solenoid valve can be turned on or off; once turned on, water begins to flow into the drip tray at the flow rate set by the flow meter. |
| ② Contoh Catu Daya | Jika catu daya sampel dan sampel terhubung, Anda dapat menghidupkan atau mematikan catu daya sampel. |
| ③ The drip tray rises | Click to raise or lower the drip tray; release to stop. |
| ④ The drip tray lowers | |
| ⑤ Meja Putar Berputar Searah Jarum Jam | Klik untuk memutar meja putar searah jarum jam atau berlawanan arah jarum jam; lepaskan untuk berhenti. Catatan: Jika ada kabel antara meja putar dan sampel, jangan memutar ke satu arah dalam waktu lama untuk menghindari kabel kusut. |
| ⑥ Pembalikan Meja Putar | |
| ⑦Kembali | Klik untuk kembali ke antarmuka kerja. |
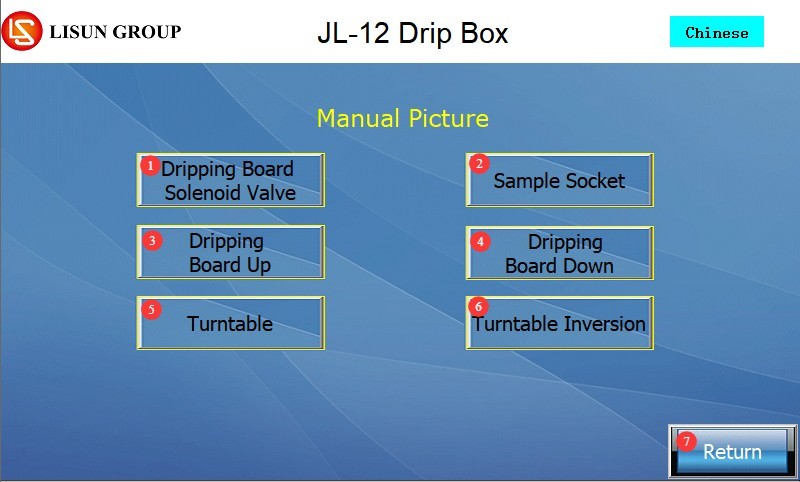
Gambar 17
4.2 Deskripsi Antarmuka Alarm Program
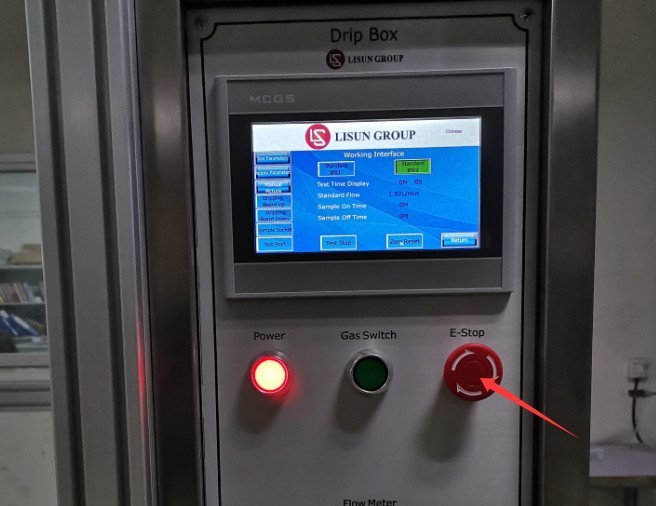
Tombol berhenti darurat belum direset. Silakan putar tombol berhenti darurat searah jarum jam untuk meresetnya, lalu coba lagi.
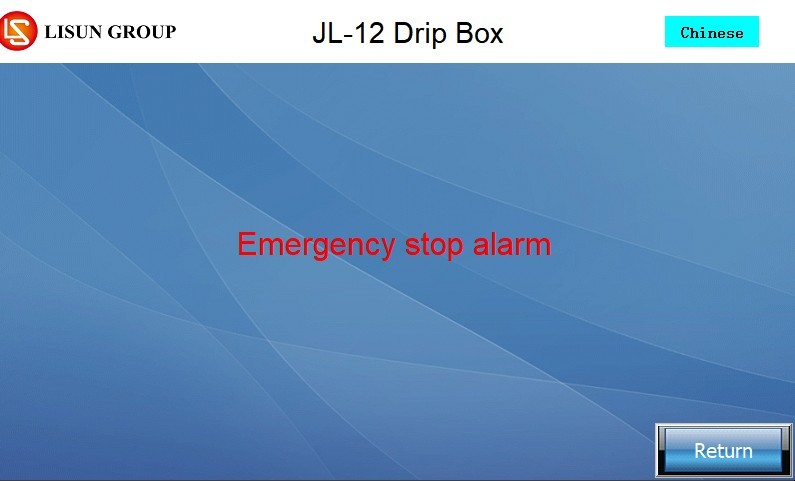
Gambar 18
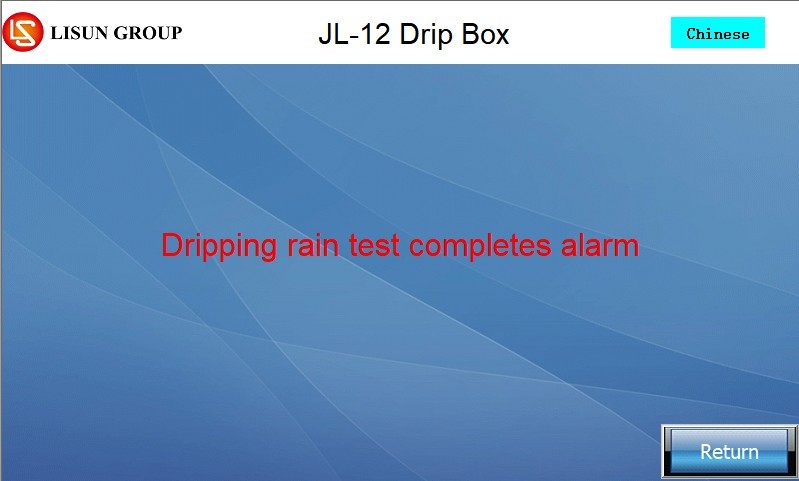
Gambar 18.1
The water droplet test is complete. Click “Back” to continue.
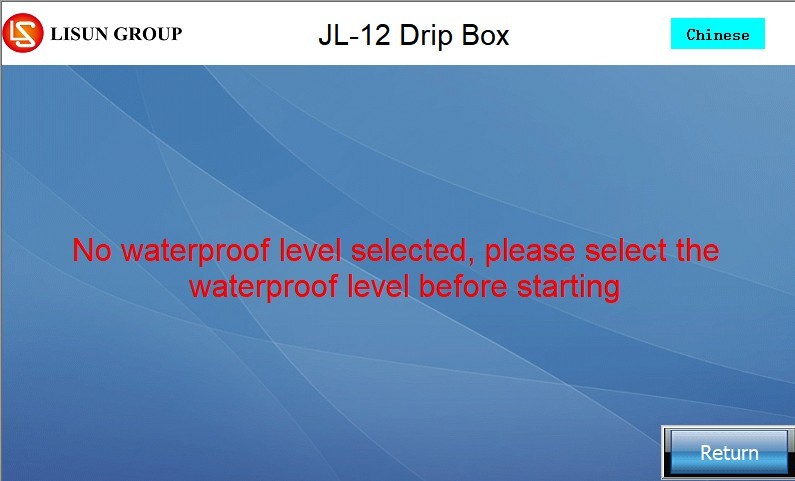
Gambar 19
Belum ada peringkat ketahanan air yang dipilih. Silakan klik “Kembali,” pilih peringkat ketahanan air yang ingin Anda uji, dan coba lagi.
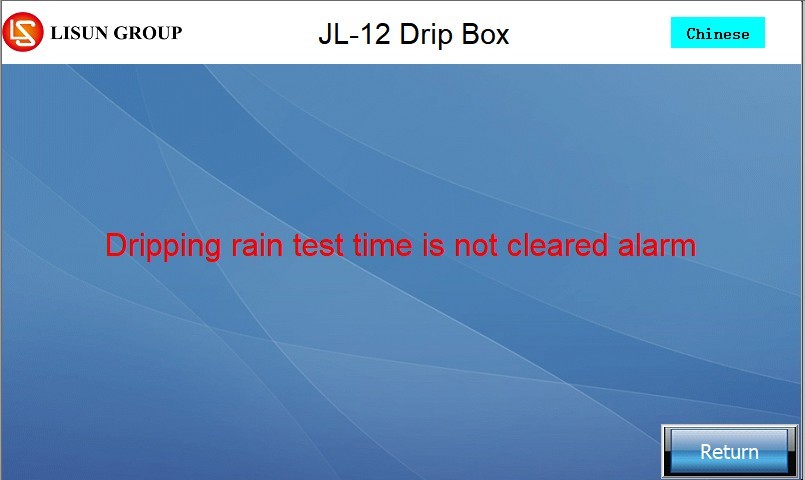
Gambar 20
Waktu pengujian belum direset. Silakan klik “Kembali,” lalu klik “Reset” untuk menghapus data dari pengujian sebelumnya dan coba lagi.
Gambar 21
5. Water Drop Test Procedure
5.1 Siap
5.1.1 Test Parameter Requirements
| Peringkat Tahan Air | IPX1 (Vertical Water Drops) | IPX2 (dripping water at a 15° angle) |
| Metode tes | Place the specimen on the turntable with its axis 100 mm from the turntable’s axis. Note: Please manually install and secure the specimen to the turntable. | The specimen is tilted 15° at each of the four fixed positions. Note: The turntable must be manually tilted 15° and secured. |
| Durasi Tes | Total: 10 menit | Total duration: 10 minutes (2.5 minutes per position). During the test, the turntable automatically rotates to the four positions specified in the standard and performs the test without requiring manual intervention. |
| Turntable Requirements | Rotation speed: 1 r/min, continuous rotation | No rotation, fixed position |
| Curah hujan | 1–1.5 mm/mnt | 3–3.5 mm/mnt |
| Since drip plates come in a variety of sizes, the standard setting is a flow meter (L/min) rather than a rainfall gauge (mm/min). Before the equipment leaves the factory, we have already converted the rainfall rate into water flow based on the drip plate size and displayed it in the working interface. When conducting your tests, simply adjust the flow meter to the correct flow rate indicated on the screen. | ||
Note 1: How to tilt the turntable 15°.
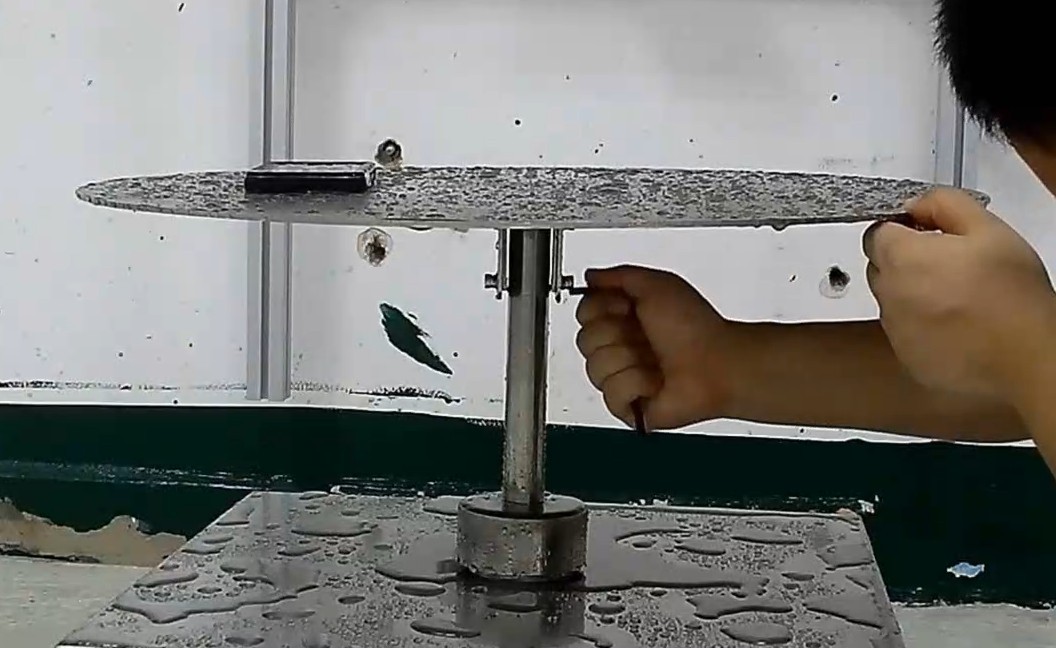
Gambar 22
Note 2: Formula for converting water flow rate to rainfall: Water flow rate (L/min) = Rainfall (mm/min) × 0.001 × Rainfall area (m²) × 1000 (1 millimeter = 0.001 meter; 1 cubic meter = 1000 liters)
5.1.2 Menghubungkan Kabel Daya Sampel
If the sample requires testing under power, use the standard waterproof plug and socket to make the connection, and check that the connection is secure and free of looseness.
| Nomor | Note |
| ① | Connect the sample power cord to the waterproof plug labeled ④, then ensure the waterproof plug remains inserted into the waterproof socket. |
| ② | Connect the power cord of the waterproof plug and receptacle to power outlet ③ on the turntable. |
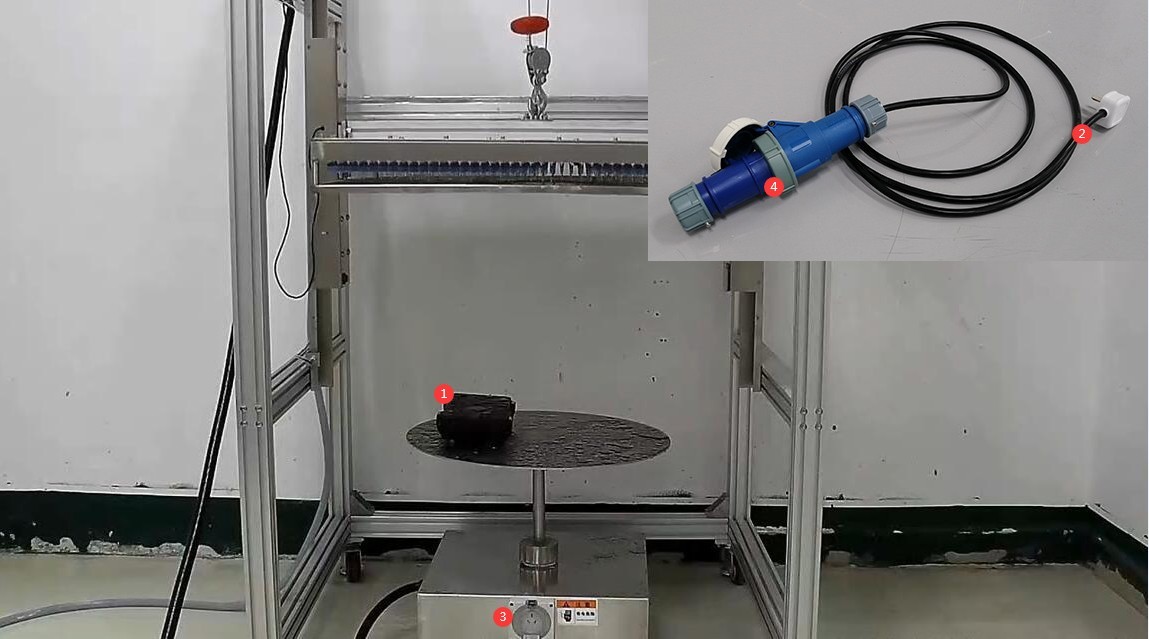
Gambar 23
5.2 Uji Coba Saat Memulai
5.2.1 Selection of Levels and Parameters
On the main touchscreen interface, tap the IPX1 or IPX2 water resistance rating selection button, and the program will automatically apply the standard parameters; tap the “Test Parameters” button to confirm that all test parameters meet the standard requirements, and then tap “Back” once the settings are complete.
5.2.2 Adjusting the Drip Tray Position
Click the “Lower Drip Tray” button on the work interface; the drip tray will lower automatically until it hits the limit switch and stops. At this point, the distance between the drip tray and the top of the sample is 200 mm (as required by the standard), and no manual adjustment is necessary.
5.2.3 Water Flow Regulation
Make sure the tap at the water inlet is turned on, then click “Start Test” to open the inlet solenoid valve. Tap water will slowly flow into the water circuit until water begins to drip from the needle on the drip tray;
Observe the standard flow rate display area on the touchscreen interface. Assuming a standard drip tray size of 800 × 800 mm, the standard water flow rate for IPX1 should be 0.64 L to 0.96 L/min, and the standard water flow rate for IPX2 should be 1.92 L to 2.24 L/min;
Turn the black knob on the flow meter in the control cabinet (turn counterclockwise to increase flow, clockwise to decrease flow). Observe the top surface of the float inside the flow meter; the water flow should remain stable within the standard range. Once adjustment is complete, keep the knob in that position.
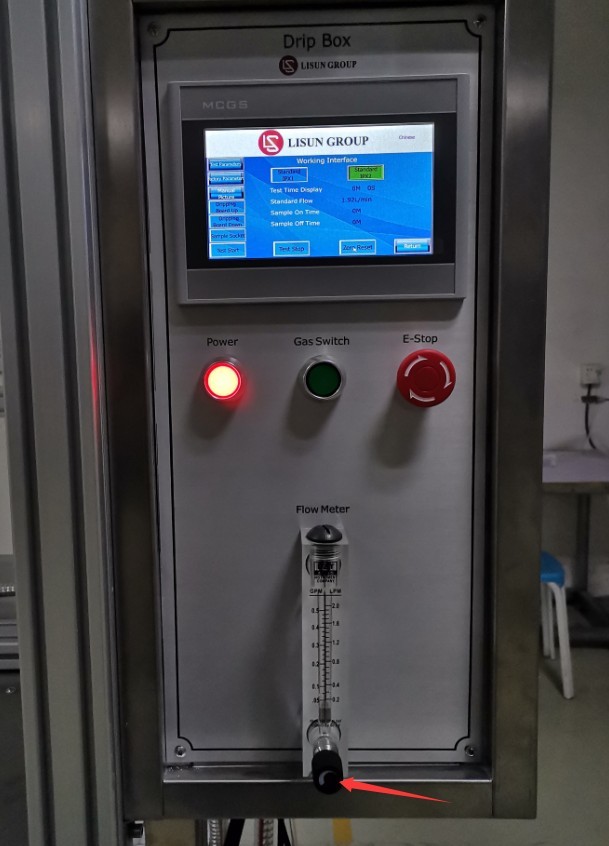
Gambar 24
5.3 Memantau Proses Pengujian
Real-time monitoring during the test: The IPX1 turntable speed is maintained at 1 r/min; for IPX2, after 2.5 minutes of testing at each position, the turntable automatically rotates to the next position until the test is complete; water drips evenly from the needle; the sample does not wobble or shift; and there are no water leaks at any interfaces;
If the sample is powered on for testing, monitor its operating status to ensure there are no abnormalities such as short circuits or tripped circuit breakers; if any problems occur, immediately click “Stop Test” or press the emergency stop button, restore the equipment and sample to normal operation, and then restart the test.
6. Prosedur Pasca-Ujian
6.1 Tindakan Segera Setelah Tes Selesai
6.1.1 Drip Tray and Sample
Press the “Stop Test” button, or wait for the test to end automatically; the water inlet solenoid valve will then close automatically. However, water will still remain in the drip tray, and dripping will continue for a short time. You may remove the sample directly from the turntable.
6.1.2 Layar Sentuh
Periksa apakah tampilan waktu pengujian pada antarmuka kerja berfungsi dengan benar, lalu klik “Hapus dan Atur Ulang” untuk bersiap menghadapi pengujian berikutnya.
6.2 Mengatur Ulang Perangkat
6.2.1 Drip Pan Reset
If the next test will not be performed in the near future, drain the accumulated water from the drip tray to prevent the needle from clogging.
If an air compressor is connected, first remove 2–3 pins from the drip tray (Important!), then press the air-release switch on the control cabinet to quickly expel the accumulated water using compressed air.
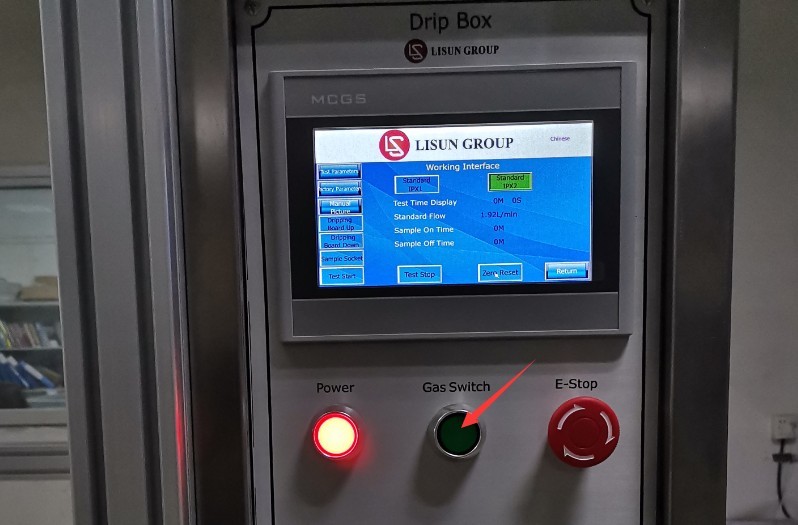
Gambar 25
After draining the accumulated water, press the “Air On” switch again to cut off the air supply to the air compressor, then reinstall the removed needle.
If there is no air compressor available, remove a few needles to allow the accumulated water to drain out naturally. Once the water has drained completely, reinstall the needles.
Then tap the “Raise Drip Tray” button on the touchscreen to raise the drip tray to its highest position, preparing it for the next test.
TIDAK PERNAH Shutdown
After all tests for the day are completed, close the water inlet valve and turn off the equipment’s circuit breaker and power switch.
6.3 Evaluasi Hasil Tes
Use a dry cloth to wipe away any water droplets from the outer surface of the sample, and then test the sample. Determine whether the sample has passed the test based on the following criteria.
| Kriteria evaluasi | Persyaratan Khusus |
| Safety/keselamatan | Kekurangan pasokan air tidak memengaruhi pengoperasian normal peralatan atau membahayakan keselamatan. |
| Perlindungan Isolasi | Air tidak akan menumpuk pada komponen berinsulasi di mana hal itu dapat menyebabkan perambatan arus sepanjang jarak rambatan. |
| Perlindungan Komponen Listrik | Air tidak boleh masuk ke bagian yang dialiri listrik atau kumparan yang tidak dirancang untuk beroperasi dalam kondisi lembap. |
| Perlindungan Kabel | Air tidak menumpuk di dekat ujung kabel atau masuk ke dalam kabel. |
| Efektivitas Lubang Drainase | If there is a drain hole, it must be verified that incoming water will not accumulate and can be drained without damaging the equipment. |
| Peralatan tanpa lubang pembuangan | Jika air menumpuk dan membahayakan bagian-bagian yang hidup, ikuti kriteria penerimaan yang ditentukan dalam standar produk yang relevan. |
7. Pemeliharaan dan Perawatan Peralatan Harian
7.1 Pembersihan Harian
Wipe away water spots and dust from the surface of the equipment, paying special attention to the turntable and drip tray areas to prevent water spots from forming limescale;
Bersihkan layar sentuh dan panel kontrol dengan kain kering untuk mencegah air dan debu masuk ke dalam sirkuit internal.
Thoroughly clean the inside of the drip tray at least once a week. Empty any accumulated water, open the drip tray, and wipe it dry with a clean, dry cloth. After cleaning, check the inner walls for rust or scale. If there is slight rust, gently wipe it with a rust remover, then rinse thoroughly with clean water.
7.2 Regular Inspections and Replacements
Nozzles: Check that the nozzles on the drip tray are not clogged, loose, or deformed, and verify that the drips are uniform. If a nozzle is clogged, use a needle cleaner to clear it.
Connections: Check all water, air, and electrical connections to ensure there are no leaks or loose connections.
Kartrid Filter: Periksa kartrid filter di dalam filter. Jika kartrid telah berubah warna menjadi cokelat (menunjukkan bahwa kartrid jenuh dengan kotoran yang terserap), segera ganti dengan yang baru.
7.3 Pemeliharaan Peralatan yang Tidak Digunakan
7.3.1 Short-term Idle (within 1 month)
Drain all standing water from the drip tray and the water lines to prevent scale buildup on the needles and tubing;
Tutupi seluruh unit dengan kain anti debu untuk mencegah debu masuk;
Simpan peralatan di tempat yang kering dan berventilasi baik.
7.3.2 Ketidakaktifan jangka panjang (lebih dari 1 bulan)
Complete all maintenance procedures for short-term storage; disconnect all electrical, pneumatic, and water connections from the equipment; remove the air and water hoses, let them air dry, and store them properly;
Apply a layer of rust-preventive oil to the inner walls of the drip tray and the surfaces of metal parts to prevent rust; store the equipment in a cool, dry place away from direct sunlight;
Apply a small amount of industrial lubricant to moving parts such as the turntable bearings and the lifting guide rails of the drip tray to prevent rust and jamming;
Peralatan ini sebaiknya dinyalakan sebulan sekali. Masuk ke layar manual untuk menguji semua fungsi, lalu matikan setelah 5 hingga 10 menit beroperasi untuk mencegah kerusakan sirkuit.
8. Pemecahan Masalah dan Penyelesaian Masalah Umum
| Gejala Kesalahan | Kemungkinan penyebab | Prosedur |
| Alarm Layar Sentuh | Lihat 4.2 | |
| Layar sentuh menyala, tetapi tombol-tombolnya tidak merespons saat disentuh. | Touchscreen freezes, stains or water marks on the surface, internal touch module malfunction | Turn off the device, let it sit for 5 minutes, and then restart it; wipe the touchscreen with a dry cloth to remove any stains or water marks; if it still does not respond, contact us for repair. |
| The drip tray gets stuck when raising or lowering it | The drip tray is tilted, and there is debris on the cord between the lifting motor and the drip tray. | Please use a level to make sure the drip rack is vertical and not tilted; try again after clearing away any debris. |
| Air menetes tidak merata dari jarum. | The drip stand is tilted, the needle is clogged, or the water flow is insufficient | Use a level to ensure the drip tray is vertical and not tilted; use a cleaning needle to unclog any nozzles that are not dispensing water; ensure there is sufficient water flow, and adjust the flow meter to the standard flow rate. |