
 Inggris
 中文简体
中文简体 Русский
 Español
 Português
 Türkçe
 العربية
 Deutsch
 Polski
 Italiano
 Français
 한국어
한국어 ไทย
ไทย Tiếng Việt
 日本語
日本語





























Suhu Konstan Mengintegrasikan Bola
Pengguna manual
berlaku LISUN Model: IS-1.5MT,IS-1.75MT,IS-2.0MT
1. Pemahaman Dasar tentang Peralatan
1.1 Spesifikasi Teknis Utama
|
Parameter Teknis |
Note |
|
Inner Wall Coating |
Bahan baku utama adalah BaSO₄ (barium sulfat), yang memenuhi persyaratan standar seperti CIE Pub. No. 84 (1989) dan IES-LM-79. |
|
Reflektansi Spektral |
450 nm–800 nm: ρ(λ) ≥ 0.96; 380 nm–450 nm: ρ(λ) ≥ 0.92 |
|
Rentang Kontrol Suhu |
Kisaran suhu: 25°C–55°C (suhu lingkungan referensi: 25°C) |
|
Ukuran |
IS-1.5MT (Φ1.5 m), IS-1.75MT (Φ1.75 m), IS-2.0MT (Φ2.0 m); Note: Larger sizes are available upon request. |
1.2 Verifikasi Konfigurasi Peralatan
1.2.1 Membongkar
Saat membuka kemasan perangkat, tangani dengan hati-hati untuk menghindari goresan pada casing luar dengan alat tajam. Setelah membuka kemasan, periksa terlebih dahulu bagian luar perangkat untuk memastikan bahwa penutupnya tertutup dan tidak ada deformasi atau penyok yang terlihat. Jika Anda menemukan kelainan pada perangkat atau aksesorinya, segera hubungi kami.
1.2.2 Unit Utama dan Aksesoris
Unit Utama: 1 Bola Pengintegrasi Suhu Konstan Seri IS-MT.
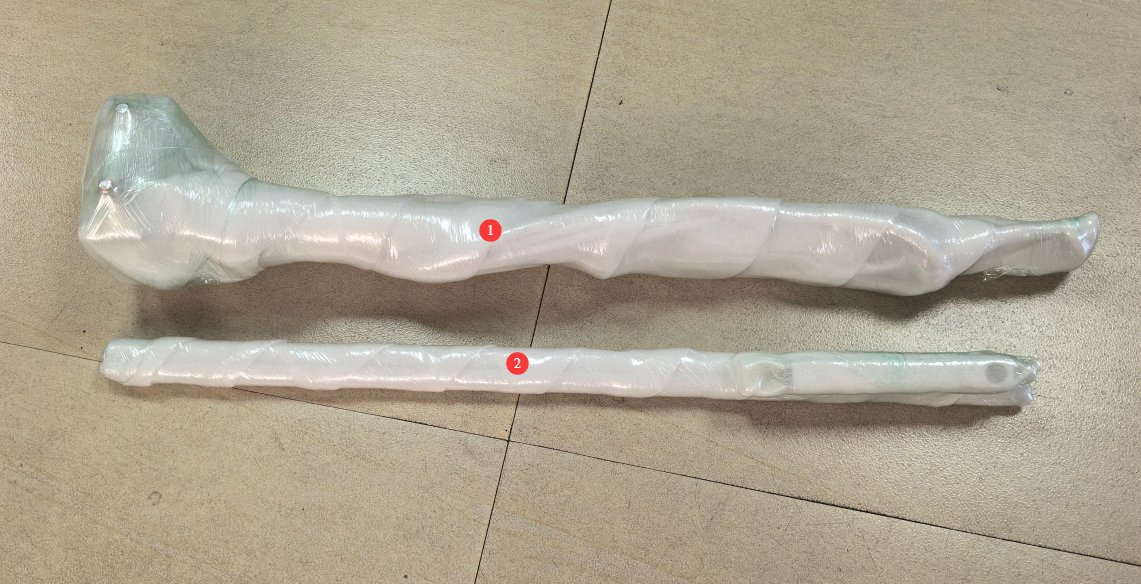
Aksesoris, lihat Gambar 1.
|
Jumlah |
Note |
|
① |
Alas, termasuk dudukan lampu E27 |
|
② |
Strip Light Fixture |
1.2.3 Mengunduh Dokumen Elektronik
We have already sent the download links for the electronic user manual, warranty card, and other documents via email at the time of shipment. Please download them as soon as possible. If you have not received the email, please contact us to request the download links again.
2. Tindakan Pencegahan untuk Penggunaan
2.1 Keamanan Listrik
Before connecting the power cord, verify that the supply voltage is AC 220 V ±10% and the frequency is 50 Hz/60 Hz. The equipment must be grounded for protection, with a grounding resistance of ≤4 Ω. Under no circumstances should the protective grounding wire be removed or disconnected, as doing so poses a risk of electric shock.
2.2 Kontraindikasi Utama Sebelum Prosedur
2.2.1 Contraindications for Coating Protection
Dilarang membawa masuk barang-barang apa pun.—including bare hands, cloths, or paper towels—agar tidak bersentuhan dengan lapisan dinding bagian dalam; jangan biarkan cairan, minyak, atau debu masuk ke dalam bola;
Begitu lapisan tersebut terkontaminasi secara luas, maka... hampir tidak mungkin untuk dipulihkanJangan mencoba menyeka atau memolesnya sendiri.
2.2.2 Operational Contraindications for Personnel
Clean white cotton gloves must be worn when working inside the sphere; tools that are dusty or greasy must not be brought into the sphere; and it is strictly prohibited to forcefully manipulate the sphere’s opening and closing mechanisms, connectors, or internal wiring.
2.3 Kode Etik Selama Operasi
2.3.1 Prosedur Operasional Internal
Tangani sampel dengan hati-hati saat memasang atau melepasnya; Jangan sentuh dinding bagian dalam bola.. Samples must be securely fastened to prevent them from falling and damaging the coating. When connecting wires, touch only the insulation and do not pull on the wire core.
2.3.2 Spesifikasi Lingkungan Pengujian
Gunakan dalam a dust-free, vibration-free environment; letakkan di permukaan yang kokoh dan rata untuk mencegah pergerakan atau guncangan;
Hindari paparan sinar matahari langsung; suhu lingkungan: 25±2°C, kelembapan ≤70% RH.
2.3.3 Standar Manajemen Bukaan Ventilasi
There are three vents inside the Integrating Sphere: a cold air inlet, a hot air inlet, and an outlet. These must be kept clear; they must not be covered or blocked;
Ventilasi pendingin udara harus tetap tidak terhalang; jangan menutupi atau memblokirnya.
3. Introduction to The Constant Temperature Integrating Sphere
3.1 Tampak depan sebelah kiri
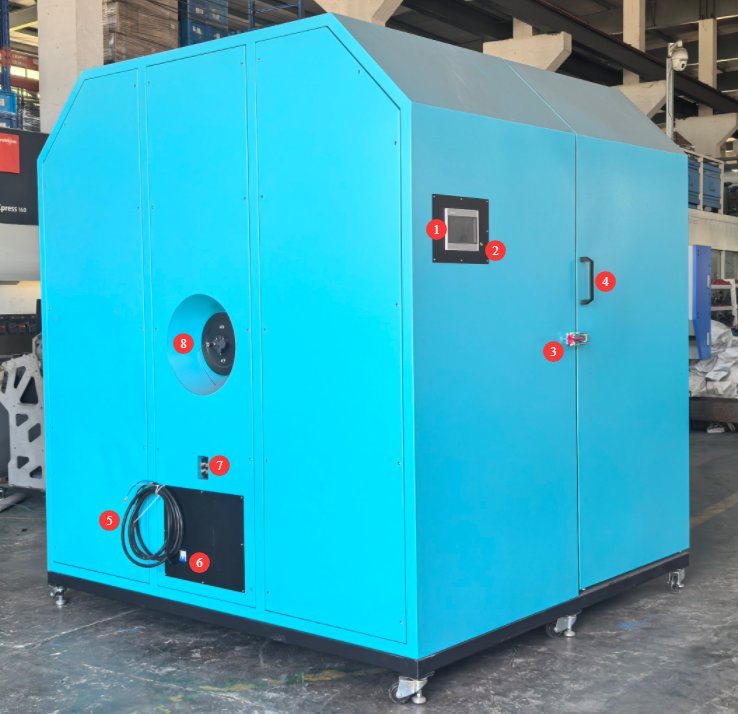
Lihat Gambar 2.
|
Jumlah |
Note |
|
① |
Layar sentuh untuk mengatur suhu, memulai pengujian, dll. |
|
② |
Saklar laser berbentuk salib, digunakan untuk mengaktifkan laser berbentuk salib di dalam Bola Pengintegrasi untuk membantu memposisikan cahaya tepat di tengah Bola Pengintegrasi. |
|
③ |
Kunci pintu |
|
④ |
Door handle: After unlocking the latch, use the handle to open the right half of the Integrating Sphere. |
|
⑤ |
Kabel daya, untuk menghubungkan Bola Integrasi Suhu Konstan ke sumber daya yang sesuai. |
|
⑥ |
Saklar daya |
|
⑦ |
Junction box: Connections for the Standard Light Source/sample lamp power cord (POWER) and sensing cable (SENSE) |
|
⑧ |
Antarmuka Serat Optik untuk Sensor Suhu Bola Lampu Suhu Konstan dan Probe Fotometrik |
3.2 Rear-Left View
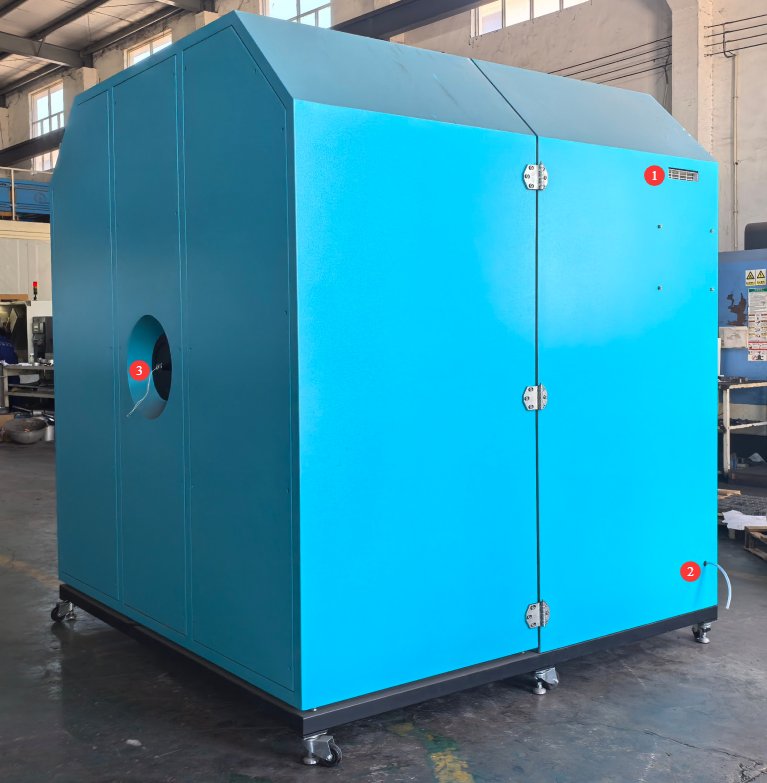
Lihat Gambar 3.
|
Jumlah |
Note |
|
① |
Ventilasi AC |
|
② |
Saluran Pembuangan AC |
|
③ |
Menghubungkan Kabel Daya Lampu Tambahan |
3.3 Di Dalam Bola Integrasi Suhu Konstan
3.3.1 Belahan Otak Kiri
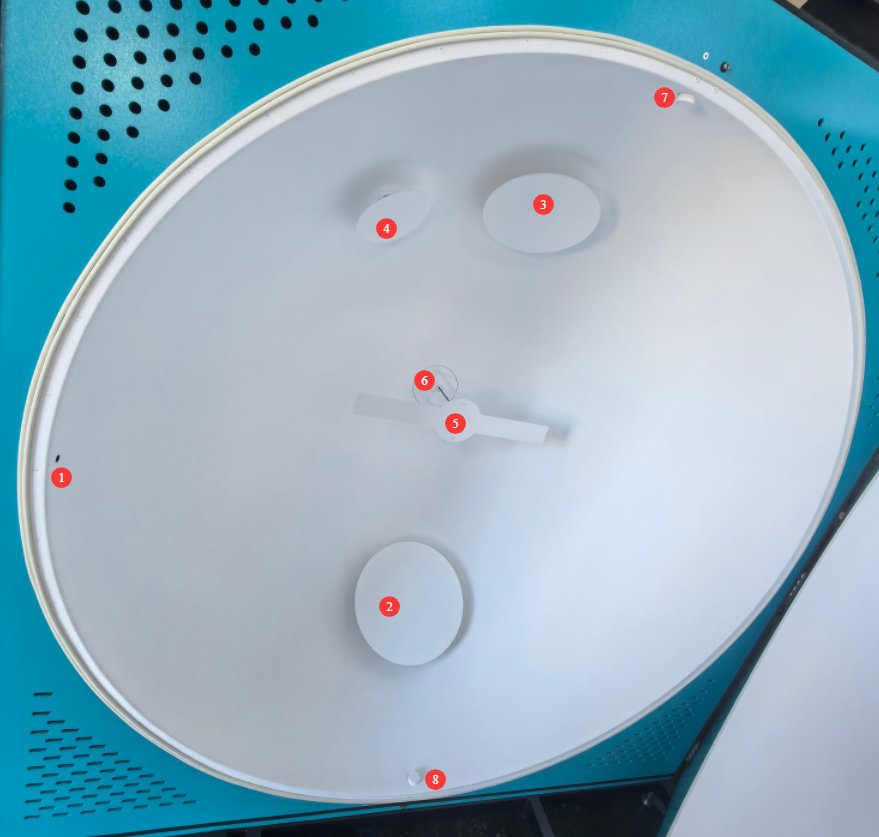
Lihat Gambar 4.
|
Jumlah |
Note |
|
① |
Laser Garis Silang |
|
② |
Saluran Masuk Udara Panas |
|
③ |
Saluran Masuk Udara Dingin |
|
④ |
Ventilasi udara |
|
⑤ |
Pelindung, digunakan untuk mencegah cahaya langsung dari sumber cahaya mengenai Serat Optik dan probe fotometrik. |
|
⑥ |
Pemeriksaan Sensor Suhu |
|
⑦⑧ |
Mounting holes for the stage; the stage can be mounted on the top or bottom of the Integrating Sphere to meet different testing requirements |
3.3.2 Right Hemisphere
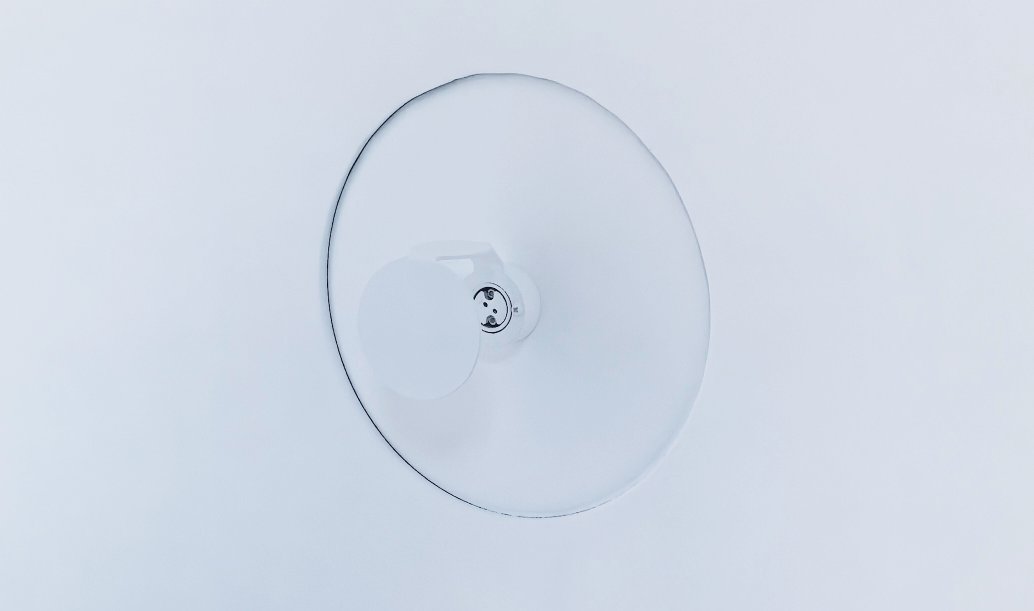
Lihat Gambar 5, yang menunjukkan perlengkapan Lampu Bantu yang digunakan untuk memasang Lampu Bantu.
4. Perakitan dan Pengkabelan Bola Integrasi Suhu Konstan
4.1 Menghidupkan Bola Integrasi Suhu Konstan
Lihat Bagian 3.1, hubungkan Bola Pengintegrasi Suhu Konstan ke sumber daya yang sesuai, dan nyalakan.
4.2 Memasang dan Menghubungkan Panggung
4.2.1 Persiapan
Untuk memudahkan pengangkutan, panggung dan perlengkapan lampu strip diamankan di dalam Bola Pengintegrasi. Lepaskan panel yang ditandai pada Gambar 6 untuk memperlihatkan panggung dan perlengkapan lampu strip yang terpasang di dalamnya.
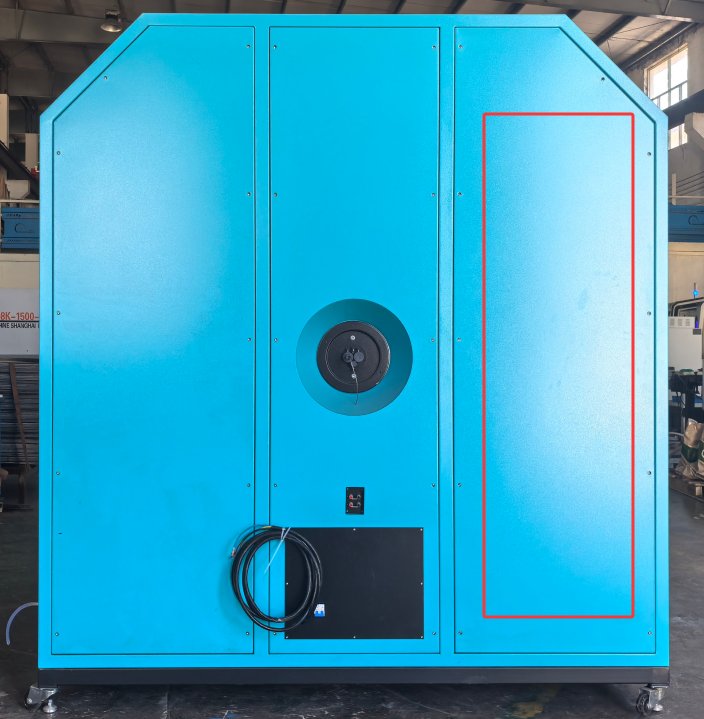
After installing the stage and connecting its cables as described in Section 4.2, and after adjusting the crosshair laser as described in Section 4.4.1, reinstall this panel.
4.2.2 Pemasangan Dudukan
The stage can be mounted either on top of the Integrating Sphere or on the bottom. Here, we use the example of mounting the stage on the bottom, as shown in Figure 7.
|
Jumlah |
Note |
|
① |
Kendurkan sekrup pemasangan. |
|
② |
Kemudian lepaskan pengganjalnya, dan Anda dapat memasang panggungnya. |
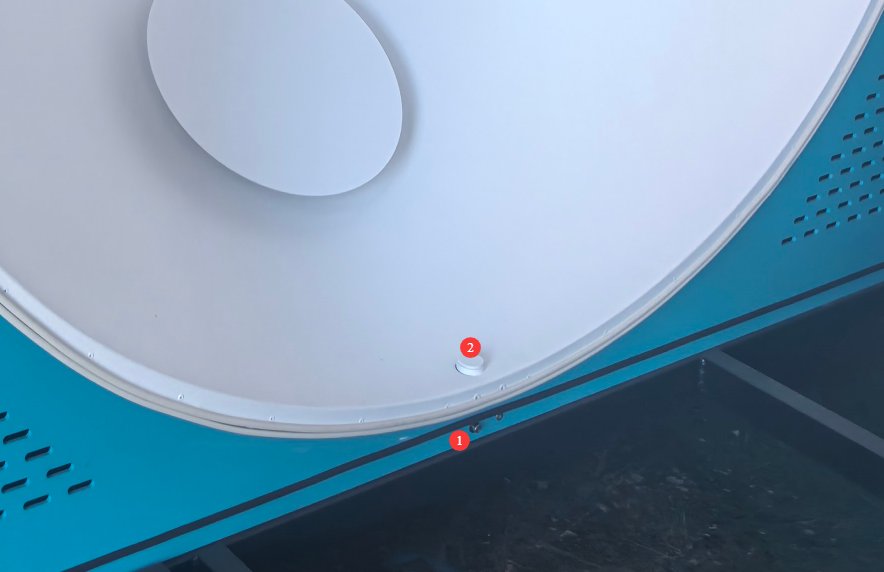
Feed the four-core cable for the stage through the bottom cable opening, as shown in Figure 8.
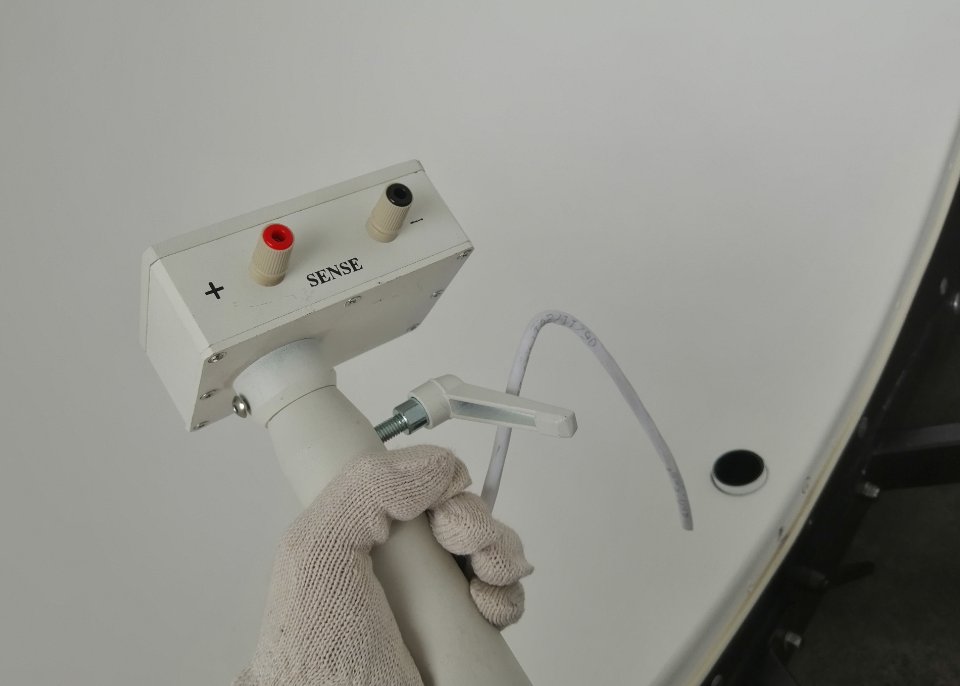
Kemudian kencangkan sekrup pemasangan untuk mengamankan panggung.
4.2.3 Four-Conductor Cable Connection for the Stage
As shown in Figure 9, simply connect the four-wire cable from the stage to the four wires provided inside the junction box, matching them one-to-one by color.
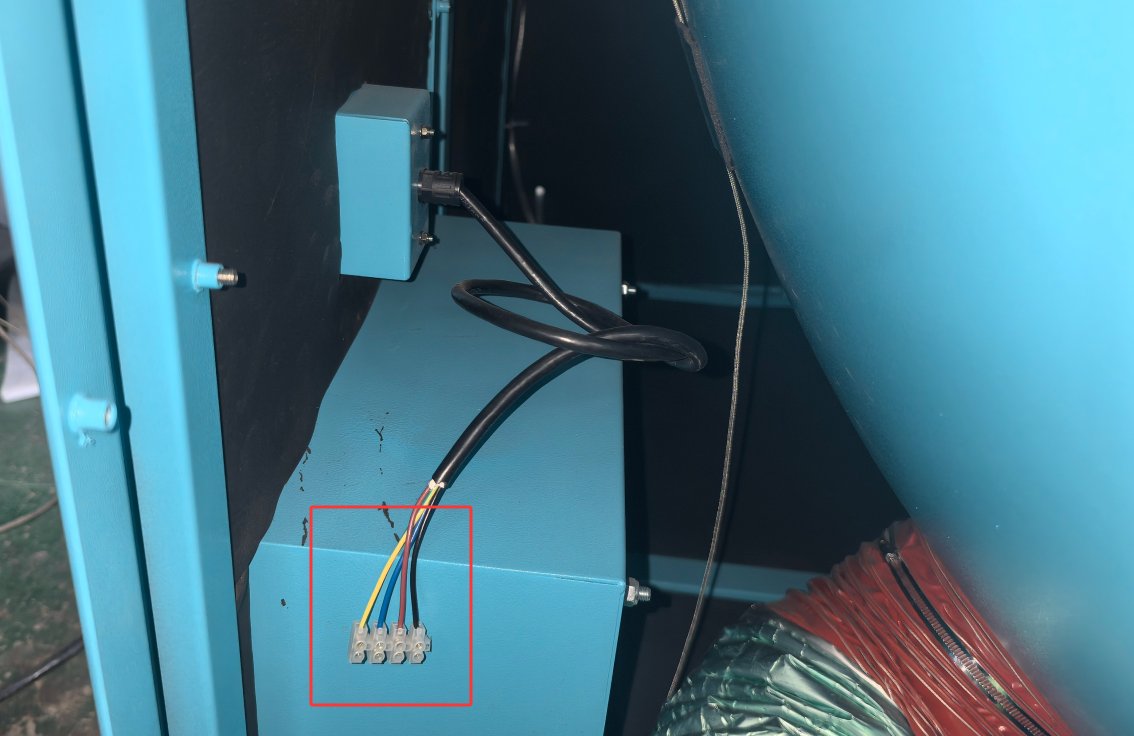
Baik kotak sambungan (Gambar 10) maupun panggung (Gambar 11) dilengkapi dengan terminal POWER dan SENSE berwarna merah dan hitam. Terminal di kedua ujungnya berhubungan satu-ke-satu; cukup hubungkan sesuai dengan warna kabel.
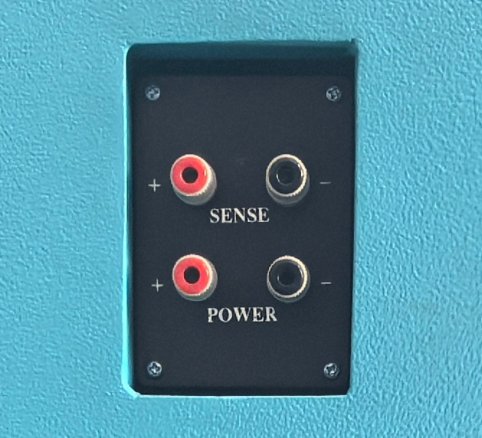
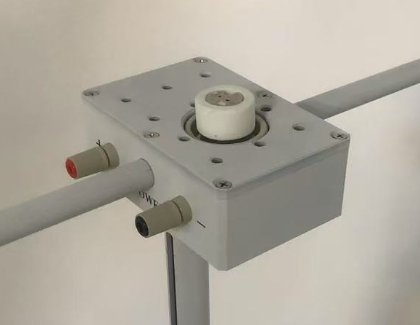
Gambar 10 Gambar 11
4.3 Pemasangan Perlengkapan Lampu Linier
Saat Anda perlu menguji lampu linier, seperti lampu tabung LED, Anda dapat menggunakan perlengkapan lampu linier untuk mengamankan lampu tabung tersebut, seperti yang ditunjukkan pada Gambar 12.
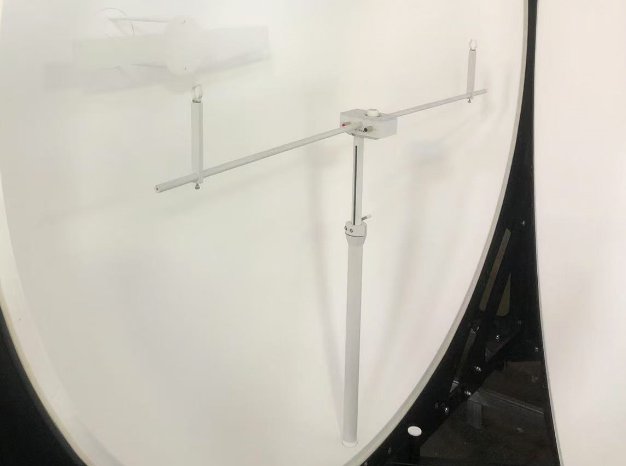
Note: When the strip light fixture is not in use, it can be removed and stored properly.
4.4 Cross-Line Laser
4.4.1 Cross-Laser Calibration
Refer to Section 3.1 to turn on the crosshair laser.
The direction of the cross-hair laser may shift or become misaligned during shipping. Please use a tape measure to confirm the center position of the Integrating Sphere, and then follow the instructions in Figure 13.
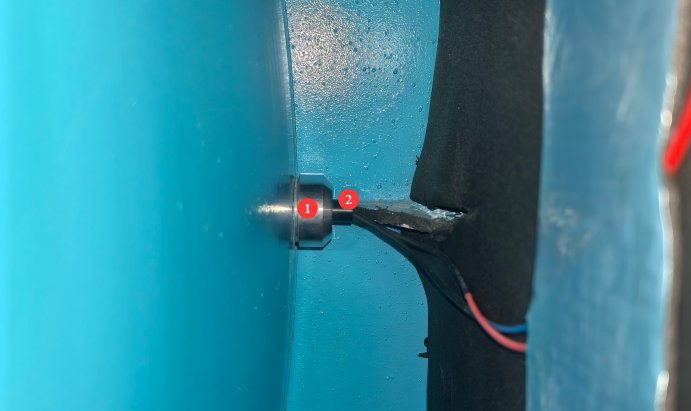
Setelah laser penunjuk sasaran disetel dengan benar, Anda dapat memasang kembali panel yang telah Anda lepas.
4.4.2 Penggunaan Laser Garis Silang
Laser penunjuk silang digunakan untuk membantu pemasangan lampu. Nyalakan laser penunjuk silang selama pemasangan untuk memastikan bahwa permukaan pemancar cahaya dari lampu yang dipasang berada tepat di tengah Bola Pengintegrasi. Matikan laser penunjuk silang selama pengujian.
5. Pengoperasian Perangkat Keras dari Bola Integrasi Suhu Konstan
5.1 Menghubungkan Aksesori Spektrometer
Refer to Section 3.1 to connect the spectrometer accessories—such as Optical Fibers, photometric probes, and temperature probes—to the corresponding dedicated ports on the Integrating Sphere.
5.2 Pemasangan dan Penyambungan Luminer Sampel
5.2.1 Lampu Bohlam dan Lampu Strip
Untuk bohlam pijar, dudukan ini dilengkapi dengan soket E27. Bohlam pijar dapat dipasang langsung ke soket E27 atau dihubungkan ke soket tersebut menggunakan adaptor; tidak diperlukan kabel tambahan di dalam Integrating Sphere.
Untuk lampu strip, lihat Bagian 4.3 dan gunakan perlengkapan lampu strip.
5.2.2 Perlengkapan Pencahayaan Lainnya
For other types of lights, simply place them on the mounting plate and secure them using the M6 screw holes provided to prevent them from slipping off.
5.2.3 Confirmation of the Installation Location of the Light-Emitting Surface
The stage is height-adjustable. Please refer to Section 4.4.2 and use the cross-hair laser to verify that the sample’s light-emitting surface is positioned exactly at the center of the Integrating Sphere. After adjusting the height, ensure that the screws are securely tightened to prevent the stage from suddenly falling; see Figure 14.
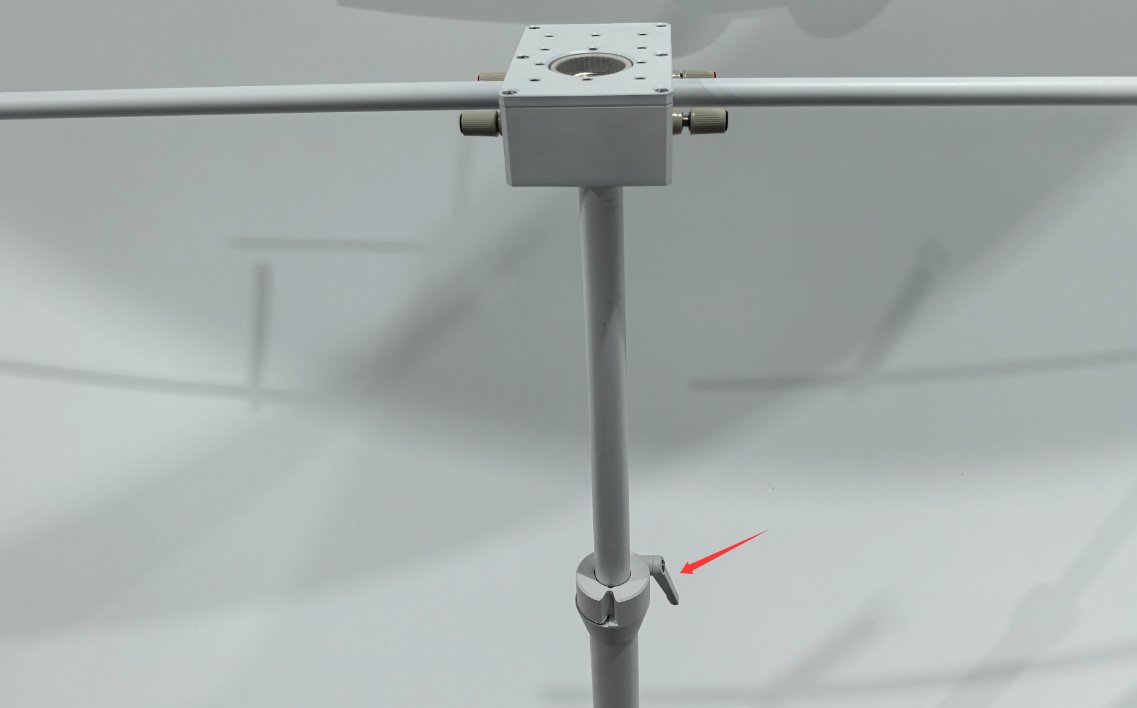
5.2.4 Connecting the Sample Power Cord
Simply connect the sample power cable to the two terminals labeled “POWER” on the stage. The two red terminals and two black terminals labeled “POWER” and “SENSE” on the stage are already internally shorted, so there is no need to connect the wires to the “SENSE” terminals on the stage separately.
5.3 Menghubungkan Kabel Daya Eksternal dan Kabel Pengambilan Sampel
The four terminals on the front of the Constant Temperature Integrating Sphere junction box are used to connect to your other devices. The two POWER terminals connect to the sample power supply wires, and the two SENSE terminals connect to the voltage sampling wires.
5.4 Menggunakan Perlengkapan Lampu Tambahan
Silakan pasang Lampu Bantu ke dudukan lampu MR16 pada perlengkapan lampu, seperti yang ditunjukkan pada Gambar 15.
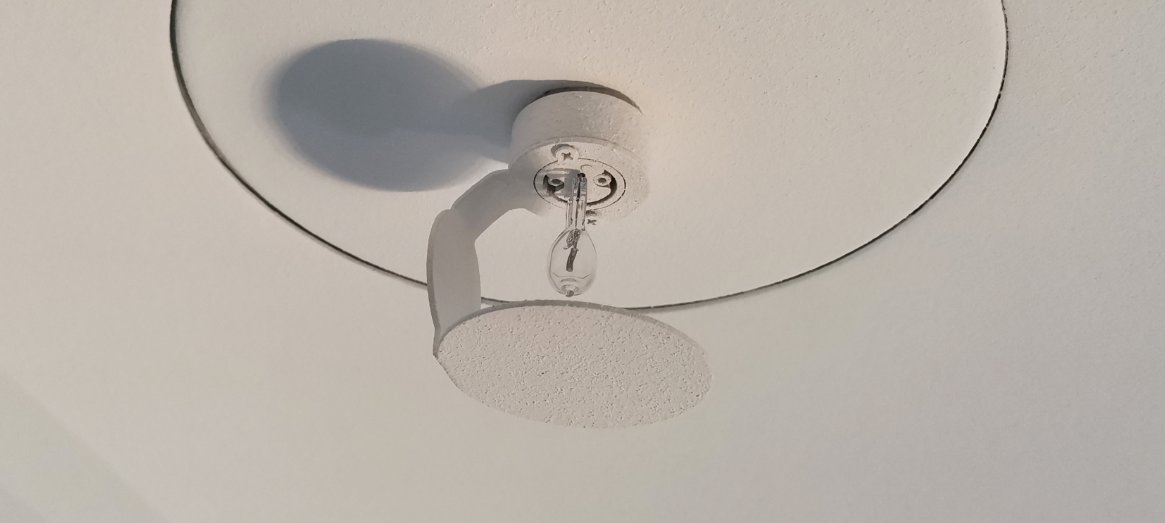
The Auxiliary Lamp clamp comes with two pre-installed power cables. When using the Auxiliary Lamp, connect it using an extension cord to a power source that meets the specified requirements.
6. Pengoperasian Layar Sentuh pada Bola Integrasi Suhu Konstan
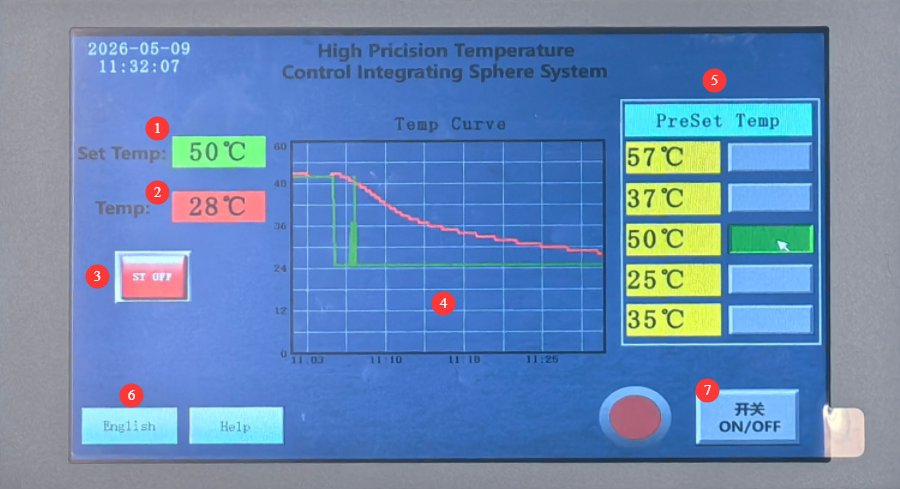
6.1 Pengantar Antarmuka Program
Lihat Gambar 16.
|
Jumlah |
Note |
|
① |
Pengaturan Suhu Saat Ini |
|
② |
Suhu aktual saat ini di dalam Bola Integrasi Suhu Konstan |
|
③ |
Self-adjusting switch: If you typically conduct tests using only one specific test temperature, you can turn this switch on to improve temperature control accuracy. Note: Turning this switch on or off has only a minor effect on temperature control. |
|
④ |
The temperature curve shows time on the horizontal axis and temperature on the vertical axis; the red line represents the actual temperature, and the green line represents the setpoint temperature. |
|
⑤ |
Pengaturan Suhu: Kolom kiri menampilkan titik suhu preset yang umum digunakan; tekan tombol pilihan di sebelah kanan untuk mengaktifkan suhu yang sesuai. Anda juga dapat menyesuaikan nilai suhu preset secara manual di sebelah kiri. |
|
⑥ |
Beralih antara Bahasa Mandarin dan Bahasa Inggris |
|
⑦ |
Tombol daya. Warna hijau menunjukkan fungsi kontrol suhu aktif, yang menaikkan suhu di dalam Bola Integrasi ke suhu yang telah ditetapkan dan mempertahankan suhu konstan; warna merah menunjukkan fungsi kontrol suhu nonaktif. |
6.2 Prosedur Pemanasan dan Pendinginan
Bola Integrasi Suhu Konstan terutama digunakan untuk pengujian suhu tinggi. Bola ini memanas relatif cepat, biasanya mencapai suhu yang ditetapkan dan stabil dalam waktu sekitar 10 hingga 20 menit.
The entire interior of the device housing is lined with insulation to prevent heat loss from the interior of the Integrating Sphere. In other words, when the Integrating Sphere is at a high temperature, both chambers inside the device—the Integrating Sphere itself and the space between the Integrating Sphere and the outer housing—are at a high temperature.
When you have just completed a high-temperature test and need to allow the internal temperature to cool down to room temperature (25°C), the cooling rate will be relatively slow if you rely solely on the equipment’s temperature control program. If necessary, you can open the Integrating Sphere directly to assist with cooling.
7. Prosedur akhir penggunaan
7.1 Operasi Bola Integrasi
You can allow the unit to cool down naturally using the temperature control program, or turn on the Integrating Sphere to accelerate heat dissipation. Once the temperature inside the sphere has returned to room temperature, if no further testing is required, you may turn off the main power to the device.
Setelah suhu di dalam Bola Pengintegrasi kembali ke suhu ruangan, segera keluarkan sampel dan kabel dari dalam Bola Pengintegrasi. Jangan meninggalkan aksesori yang tidak terkait di dalam Bola Pengintegrasi.
7.2 Tutup Bola Integrasi dengan segera
Saat Integrating Sphere tidak digunakan, pastikan untuk tetap menutupnya agar debu tidak masuk.
8. Pemeliharaan dan Perawatan Peralatan Harian
8.1 Pembersihan Debu Internal Rutin
Frekuensi: Minimal seminggu sekali; Peralatan: Pengering rambut udara dingin (Jangan gunakan udara panas); Metode: Tiup debu dari dalam bola secara perlahan; jangan biarkan benda apa pun bersentuhan dengan lapisan tersebut.
8.2 Items for Periodic Inspection
8.2.1 Structural and Opening/Closing Inspection
Each month, check the opening and closing handles and hinges; if any are loose, tighten the screws. Check that the gap where the two halves meet is even and that no light leaks through.
8.2.2 Inspeksi Lapisan Dinding Bagian Dalam
Periksa lapisan interior setiap bulan untuk memastikan tidak ada pengelupasan, penguningan, penggelapan, atau noda.
8.3 Pedoman Penyimpanan Jangka Panjang
Storage Conditions: Dry, protected from light, dust-free, temperature 0–40°C, relative humidity ≤70% RH; ensure the sphere is completely closed and covered with a dust cover; perform a thorough cleaning and inspection before storage.
8.4 Persyaratan Interval Kalibrasi
Untuk memastikan akurasi pengukuran dan keandalan operasional peralatan, disarankan agar peralatan tersebut secara berkala dikirim ke laboratorium metrologi pihak ketiga yang berkualifikasi untuk kalibrasi. Interval kalibrasi yang disarankan adalah 12 bulan. Pengguna dapat menentukan interval kalibrasi spesifik berdasarkan frekuensi penggunaan, kondisi lingkungan, dan persyaratan sistem mutu.
9. Pertanyaan yang Sering Diajukan dan Solusinya
|
Pertanyaan yang Sering Diajukan |
Prosedur |
|
Fungsi Pemanasan dan Pendinginan Abnormal pada Bola Integrasi |
Mungkin ada masalah dengan parameter backend program selama transmisi. Silakan hubungi kami agar kami dapat memeriksa dan menyesuaikannya. |
|
Sebagian kecil lapisan pelapis pada dinding bagian dalam Bola Pengintegrasi telah terkelupas. |
If the sample luminaire is accidentally dropped, causing a small area of the coating on the interior wall of the Integrating Sphere to peel off, please contact us to obtain the coating needed for repair. |
|
Pengelupasan lapisan yang luas pada dinding bagian dalam Bola Pengintegrasi. |
If the inner wall coating has peeled off over a large area due to frequent bumps or drops of the fixture, and the coating cannot be repaired, please purchase a new Integrating Sphere. |
|
Lapisan pada dinding bagian dalam Bola Pengintegrasi telah menghitam dan menguning di area yang luas. |
If the device is left uncovered for an extended period, dust is not cleaned off promptly, or it is used in harsh environments—such as those with excessive temperature or humidity, or direct sunlight—resulting in extensive yellowing of the inner wall coating that cannot be repaired, please purchase a new Integrating Sphere. |