
 Inggris
 中文简体
中文简体 Русский
 Español
 Português
 Türkçe
 العربية
 Deutsch
 Polski
 Italiano
 Français
 한국어
한국어 ไทย
ไทย Tiếng Việt
 日本語
日本語





























Catu Daya DC CC dan CV Digital
Pengguna manual
berlaku LISUN Model: DC3005S,DC3010S,DC6005S
1. Membuka Kemasan dan Mengenal Peralatan Secara Dasar
1.1 Spesifikasi Teknis Utama
| Spesifikasi/Nomor Model | DC3005S | DC3010S | DC6005S |
| Output Maksimal | 30 V / 5 A | 30 V / 10 A | 60 V / 5 A |
| Resolusi Tegangan | 0.001 V (0–60 V) | ||
| Akurasi Tegangan | ±(0.02% dari pembacaan + 0.05% dari rentang + 1 digit) | ||
| Resolusi Saat Ini | Para 0.001 | ||
| Akurasi saat ini | ±(0.05% of reading + 0.05% of full scale + 1 digit) | ||
1.2 Verifikasi Konfigurasi Peralatan
1.2.1 Membuka Kemasan dan Pemeriksaan Visual
Saat membuka kemasan perangkat, tangani dengan hati-hati untuk menghindari goresan pada casing luar dengan alat tajam. Setelah membuka kemasan, periksa terlebih dahulu bagian luar perangkat untuk memastikan tidak ada deformasi atau penyok yang terlihat, dan tombol-tombolnya tidak rusak atau longgar. Jika Anda melihat kelainan pada perangkat atau aksesorinya, jangan menyalakannya. Segera hubungi kami.
1.2.2 Unit Utama dan Aksesoris
| Jumlah | Note |
| ① | DC-S Series Power Supplies |
| ② | Kabel Listrik |
| ③ | RS-232 Communication Cable |
Download links for the electronic user manual, software warranty card, and other documents have been sent via email. Please download them as soon as possible. If you missed the email, please feel free to contact us to request the download links again.
Catatan: Semua LISUN spectroradiometer software can control the DC-S series power supplies; however, the DC-S power supplies sold separately do not come with dedicated software. Please operate them using the front panel of the device.
2. Tindakan Pencegahan Keamanan
2.1 Standar Keselamatan Listrik
The equipment’s input power supply is single-phase AAC 220 V ±10%, 50/60 Hz. It must comply with safety standards and have a reliable protective grounding system with a protective grounding resistance of ≤4 Ω to prevent electric shock.
2.2 Standar Keselamatan Lingkungan
For indoor use only; avoid direct sunlight. Place on a sturdy, stable surface to prevent excessive vibration. Ensure the environment is free of dust, corrosive gases, and flammable or explosive materials. Keep away from strong magnetic and electric fields. Ensure adequate ventilation; leave at least 10 cm of space around the device for heat dissipation, and do not block the cooling fan vents. Operating Environment: Temperature 5°C to 35°C, relative humidity ≤65% RH.
2.3 Pedoman Keselamatan Operasional
Do not operate the equipment or plug in or unplug the power cord with wet hands; Output must be turned off before connecting or disconnecting wires; do not touch the output terminals, internal components, the load, or load wiring while the equipment is operating; do not shut down the equipment directly while it is in output mode; turn off the output first before shutting down the equipment; if you notice an unusual odor, smoke, unusual noise, or overheating, immediately disconnect the power and do not continue operation.
3. Gambaran Umum Peralatan dan Pengkabelan
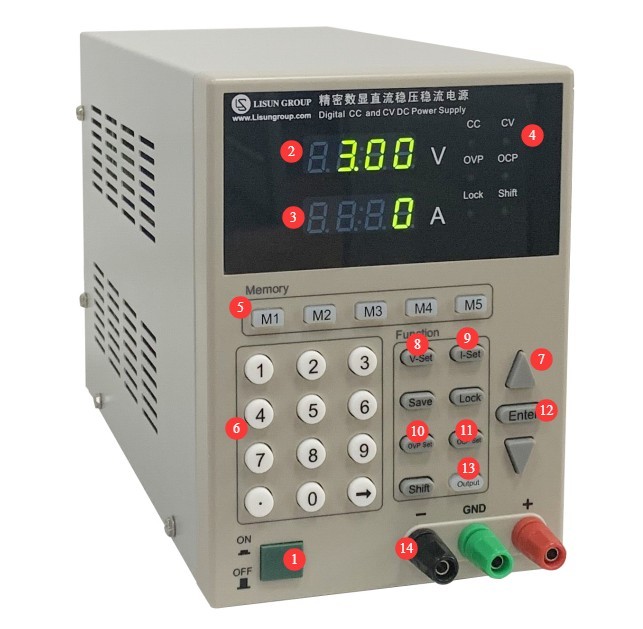
3.1 Pengantar Panel Depan
| Jumlah | Note |
| ① | Saklar daya |
| ② | Jendela tampilan tegangan V; “—–” muncul ketika tegangan melebihi batas. |
| ③ | Current display window A; “—–” appears when the limit is exceeded. |
| ④ | Indicator lights. CC: Constant Current; CV: Constant Voltage; OVP: Overvoltage Protection Triggered; OCP: Overcurrent Protection Triggered |
| ⑤ | Memory Keys: The device can store 5 sets of configuration data, allowing for quick setup. |
| ⑥⑦ | You can use the number keys or the up and down arrows to adjust the settings. |
| ⑧ | V-Set: Press to set the voltage |
| ⑨ | I-Set: Press to set the current |
| ⑩ | OVP set—press to set the upper limit of the output voltage |
| ⑪ | OCP set—press to set the upper limit for the output current |
| 1 | After setting the values, press the ENTER key to confirm. |
| ⑬ | ON/OFF button: Tap to turn the power output on or off |
| ⑭ | Output terminals: Connect to your DC load, observing the correct polarity. |
3.2 Pengenalan Panel Belakang
| Jumlah | Note | |
| ① | Power cord receptacle, with a fuse, for connecting the device to an appropriate power source | |
| ② | RS-232 communication port: If you need to use other software to configure and control the power output, please connect it to a computer. | |
| ③ | Terminal keluaran; terminal ini memiliki fungsi yang sama dengan terminal keluaran pada panel depan perangkat. | |
| ④ | The external sampling terminal, which is also connected to your DC load, allows you to obtain a more accurate load-side voltage. If you require high voltage sampling accuracy, please connect it; leaving it unconnected does not affect the DC power supply’s output functionality. Be sure to observe the correct polarity when wiring. | |
| ⑤ | Sampling Selector Switch | The factory default is Side A, with internal sampling. |
| If you have an external sampling terminal connected, switch to Side B for external sampling. | ||
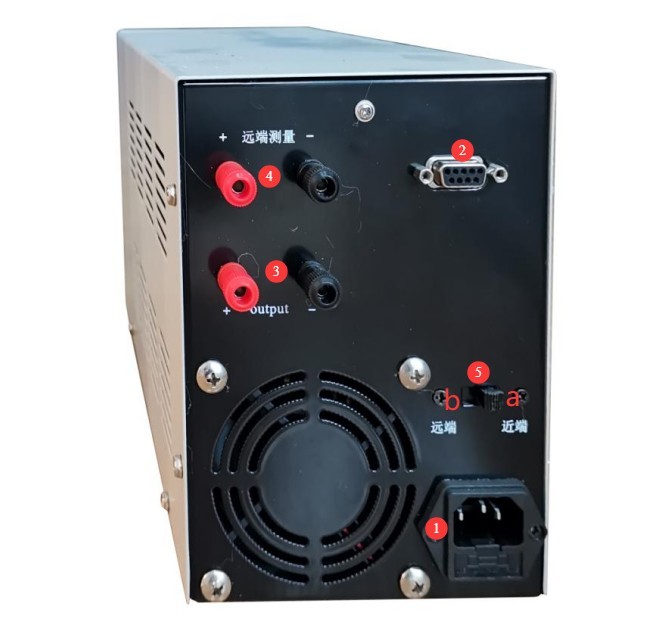
Note 1: External sampling uses a 4-wire configuration to eliminate cable voltage drop; internal sampling includes cable voltage drop.
Note 2: For the output terminals, connect either the front panel or the rear panel—one or the other is sufficient.
4. Pengoperasian Peralatan
4.1 Verification of OVP/OCP Settings
To ensure normal operation, the device is set to its maximum output value at the factory. For example, for the DC3005S, the OVP value is set to 30 and the OCP value is set to 5. If you need to review and adjust these settings, follow the steps below.
| petunjuk | Note |
| ① | Press the OVP Set button; the voltage display will show the currently set OVP value. If it is incorrect, you can use the numeric keys to reset it, then press the ENTER key to confirm. |
| ② | Press the OCP Set button; the current display will show the currently set OCP value. If it is incorrect, you can use the numeric keys to reset it, then press the ENTER key to confirm. |
4.2 Keluaran Tegangan Konstan
| petunjuk | Note |
| ① | If you want the device to save the settings, press the corresponding memory button first. |
| ② | Press the I-Set key to set the current to the maximum output value, or at least to a value sufficient for constant-voltage output. Use the numeric keys to set the value directly, then press the ENTER key to confirm. |
| ③ | Press the V-Set key to set the voltage to the desired rated value, then press the ENTER key to confirm. |
| ④ | Press the ON/OFF button to control the output; the CV indicator lights up when the output is active. |
Note: If, during output, the CV indicator turns off and the CC indicator turns on, the set current value is insufficient to maintain the rated voltage of the DC load; you will need a DC power supply with a higher maximum output current.
4.3 Keluaran Arus Konstan
| petunjuk | Note |
| ① | If you want the device to save the settings, press the corresponding memory button first. |
| ② | Press the V-Set key to set the voltage to the maximum output value, or at least to a value sufficient for constant-current output. Use the numeric keys to set the value directly, then press the ENTER key to confirm. |
| ③ | Press the I-Set button to set the current to the desired rated value, then press the ENTER button to confirm. |
| ④ | Press the ON/OFF button to control the output; the CC indicator light turns on when the output is active. |
Note: If, during debugging, the CC indicator turns off and the CV indicator turns on, this indicates that the set voltage value is insufficient to meet the rated current output of the DC load. You will need a DC power supply with a higher maximum output voltage.
5. Pemeliharaan dan Perawatan Peralatan Harian
5.1 Perawatan Rutin
5.1.1 Pembersihan Harian
Be sure to turn off the power and unplug the power cord before cleaning. We recommend wiping the unit with a soft, antistatic cotton cloth and a mild detergent; do not spray liquids directly onto the unit. Do not use chemical solvents such as benzene, toluene, or acetone.
5.1.2 Pemeriksaan Rutin
Before each use, check that the power cord and terminal connections are secure and free of burn marks; ensure that the fan vents are not blocked; and after turning on the unit, verify that the indicator lights and display are functioning properly.
5.2 Spesifikasi Penyimpanan
5.2.1 Persyaratan Lingkungan Penyimpanan
Suhu: 5°C hingga 35°C; kelembapan relatif: ≤65% RH; lingkungan kering, bebas debu, dan bebas dari gas korosif.
5.2.2 Operasi Penyimpanan Jangka Panjang
Turn off the power and unplug all cables; clean the equipment and wrap it in dust-proof film; turn on the power for 10 minutes every 3 months to prevent moisture damage to the components.
Memecahkan Masalah dan Menyelesaikan Masalah Umum
| Gejala Kesalahan | Kemungkinan penyebab | Prosedur |
| Tidak dapat menyala | Kabel catu daya input longgar, sekering putus | Matikan daya dan periksa sambungan kabel catu daya input; matikan daya, lakukan pemeriksaan untuk kemungkinan korsleting atau kelebihan beban, ganti sekering dengan yang memiliki nilai yang sama, dan jangan menambah nilai arus. |
| The settings are fine, but the OCP and OVP indicator lights are on. | Output Short Circuit, Output Out-of-Limits, and Device Overheating Protection | Stop output, check the output wiring, and retry after ruling out a short circuit; verify that the load’s rated voltage and current are within limits—for example, the maximum output voltage and current for the DC3005S model are 30V and 5A; shut down the unit, allow it to ventilate, clean the ventilation openings, and restart it after it has cooled down. |
| Kipasnya tidak berputar | Penumpukan debu, kerusakan motor | Matikan daya dan bersihkan debu dari kipas; jika masalah berlanjut, silakan hubungi kami untuk perbaikan atau penggantian kipas. |
7. Daftar Kemasan
| Nomor | Nama | Jumlah |
| ① | DC-S Series Power Supply Unit | Unit 1 |
| ② | Kabel Listrik | Sepotong 1 |
| ③ | RS-232 Communication Cable |